- 01-第一个Vue程序
- 02 条件判断if-else
- 03 循环
- 04 事件
- 05 双向数据绑定
- 06 Vue组件
- 07 Axios通信
- 08 计算属性
- 09 插槽
- 10 自定义事件
- 11 第一个vue-cli项目
- 12 Webpack学习
- 13 vue-router学习
- 14 Vue结合ElementUI
- 15 嵌套路由,传递参数
- 16 路由模式与404
- 17 路由钩子
前言:
vue官网
狂神vue教程
ElementUI
前端串一串:
-逻辑
--- 判断
--- 循环
-事件
---浏览器事件:window document
---Dom事件:增删,遍历,修改节点元素内容
---JQuery
-视图
---html
---css:ElementUI,BootStrap等
-通信
---ajax
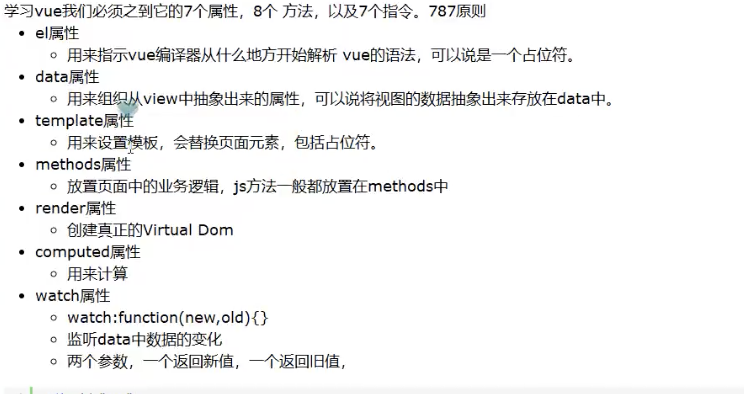
Vue常用属性:
01-第一个Vue程序
<!DOCTYPE html>
<html lang="en">
<head>
    <meta charset="UTF-8">
    <title>Title</title>
    <script src="https://cdn.jsdelivr.net/npm/vue/dist/vue.js"></script>

</head>
<body>

<div id="app">
    {{message}}
</div>

<script>
    var vm = new Vue({
        el: "#app",
        data:{
            message:"hello,vue"
        }
    });
</script>

</body>
</html>
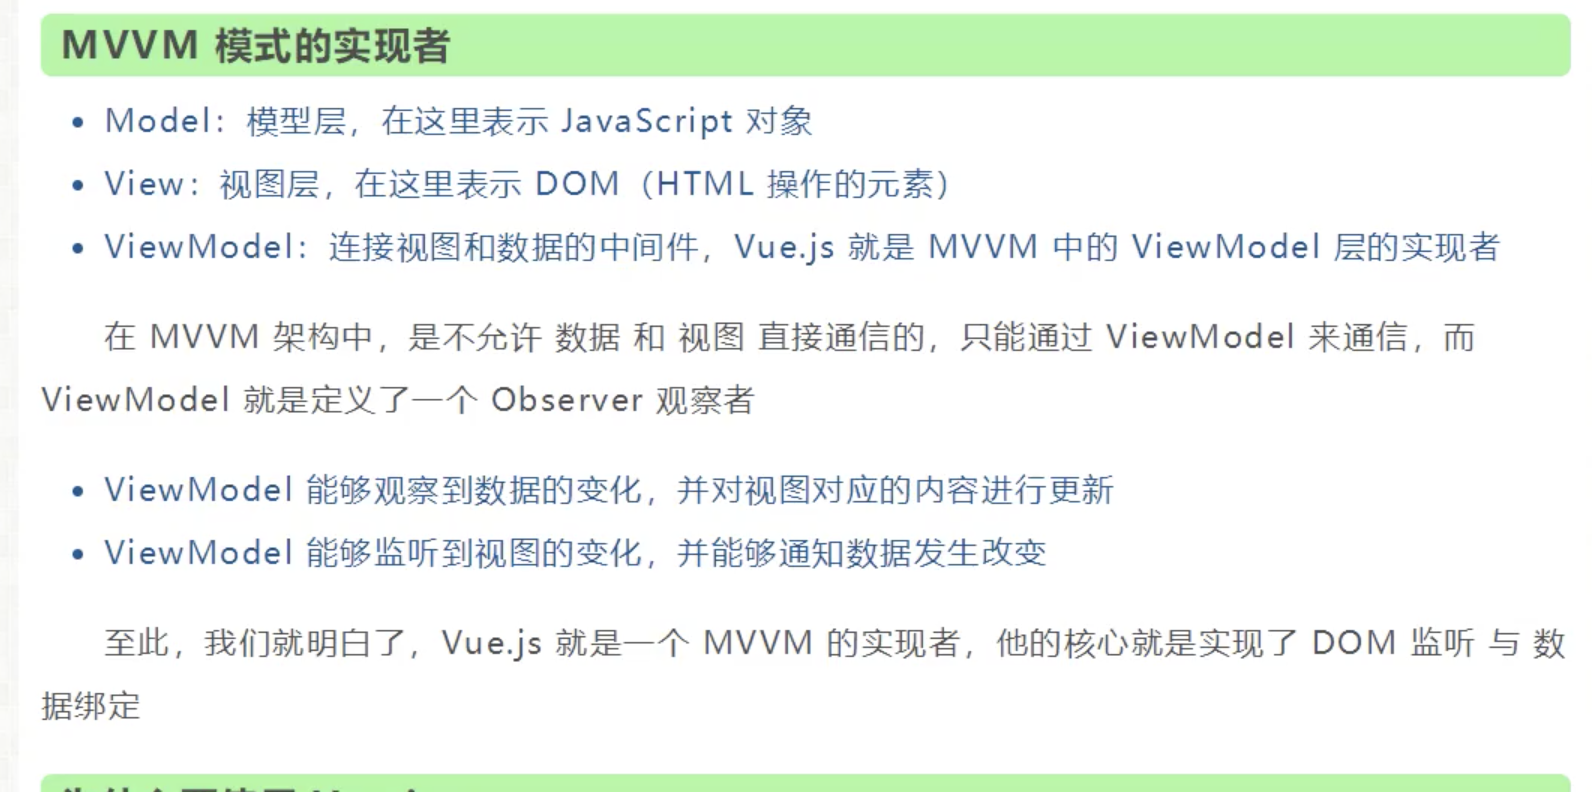
理解MVVM模式的先进性!前后端分离啦
可以用v-bind属性绑定数据
<div id="app" >
<!--    <h2>{{message}}</h2>-->
    <span v-bind:title="message">鼠标悬停几秒</span>
</div>
02 条件判断if-else
<div id="app" >
    <h2 v-if="ok">yes</h2>
    <h2 v-else="ok">no</h2>
    <h3 v-if="type==='A'">A</h3>
    <h3 v-else-if="type==='B'">B</h3>
    <h3 v-else>other</h3>
</div>

<script>
    var vm = new Vue({
        el: "#app",
        data:{
            ok: false,
            type: 'C'
        }
    });

</script>
03 循环
<div id="app" >
    <li v-for="item in items">
        {{item.message}}
        {{item.data}}
    </li>
</div>


<script>
    var vm = new Vue({
        el: "#app",
        data:{
            items:
                [{message: 'wu', data:'d1'},
                {message: 'ming', data:'d2'},
                {message: 'gao', data:'d3'}]
        }
    });
</script>
04 事件
<div id="app" >
    <p>{{message}}</p>
    <button v-on:click="sayHi">click me</button>
</div>


<script>
    var vm = new Vue({
        el: "#app",
        data: {
            message: "你好,我是data里面的message"
        },
        methods: { //方法必须定义在Vue的method对象中
            sayHi: function () {
                // alert(this.message);
                this.message='注意,我是click变换的message';
            }
        }
    });
</script>
05 双向数据绑定
前面都是数据发生变化,视图变化,然而vue还可以使得 当视图发生变化,数据也发生变化!这就是Vue的精髓

通过v-model绑定,应该绑定的是value值
<div id="app" >
    <p>{{message}}</p>
    <input type="text" v-model="message"/>
</div>

<div id="app2" >

    性别:<input type="radio" name="sex" value="男" v-model="checkValue">男
    <input type="radio" name="sex" value="女" v-model="checkValue">女
    <p>
        选中的性别:{{checkValue}}
    </p>

    下拉菜单:
    <select name="type" v-model="selectValue">
        <option value="">请选择</option>
        <option>A</option>
        <option>B</option>
        <option>C</option>

    </select>
    下拉菜单选中的值:{{selectValue}}
</div>

<script>
    var vm = new Vue({
        el: "#app",
        data: {
            message: "你好,我是data里面的message"
        },
        methods: { //方法必须定义在Vue的method对象中

        }
    });

    var vm2 = new Vue({
        el: "#app2",
        data: {
            checkValue: '男',
            selectValue: ''
        },
        methods: { //方法必须定义在Vue的method对象中

        }
    });
</script>
06 Vue组件
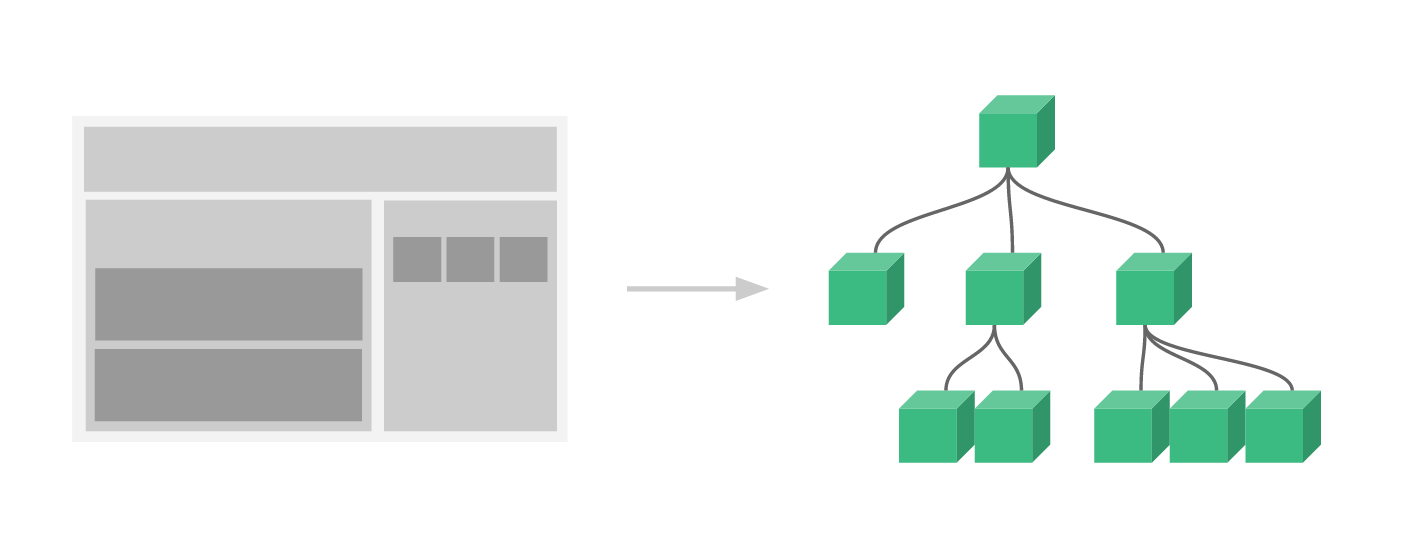
组件系统是 Vue 的另一个重要概念,因为它是一种抽象,允许我们使用小型、独立和通常可复用的组件构建大型应用。仔细想想,几乎任意类型的应用界面都可以抽象为一个组件树:
<div id="app" >
    显示自定义组件:
    <wuminggao></wuminggao>
    <ol>
        创建一个 todo-item 组件的实例:
        <todo-item></todo-item>
    </ol>

    <item-value v-for="item in items" v-bind:wu="item"></item-value>
</div>

<script>

    Vue.component('wuminggao', {
        template: '<li>Hello,组件</li>'

    });

    Vue.component('todo-item', {
        template: '<li>这是个待办项</li>'
    });

    Vue.component('item-value', {
        props: ['wu'],//接收参数
        template: '<li>{{wu}}</li>'
    });


    var vm = new Vue({
        el: "#app",
        data: {
            message: "你好,我是data里面的message",
            items: ["Java", "python", "C++"]
        },
        methods: {

        }
    });
</script>
07 Axios通信
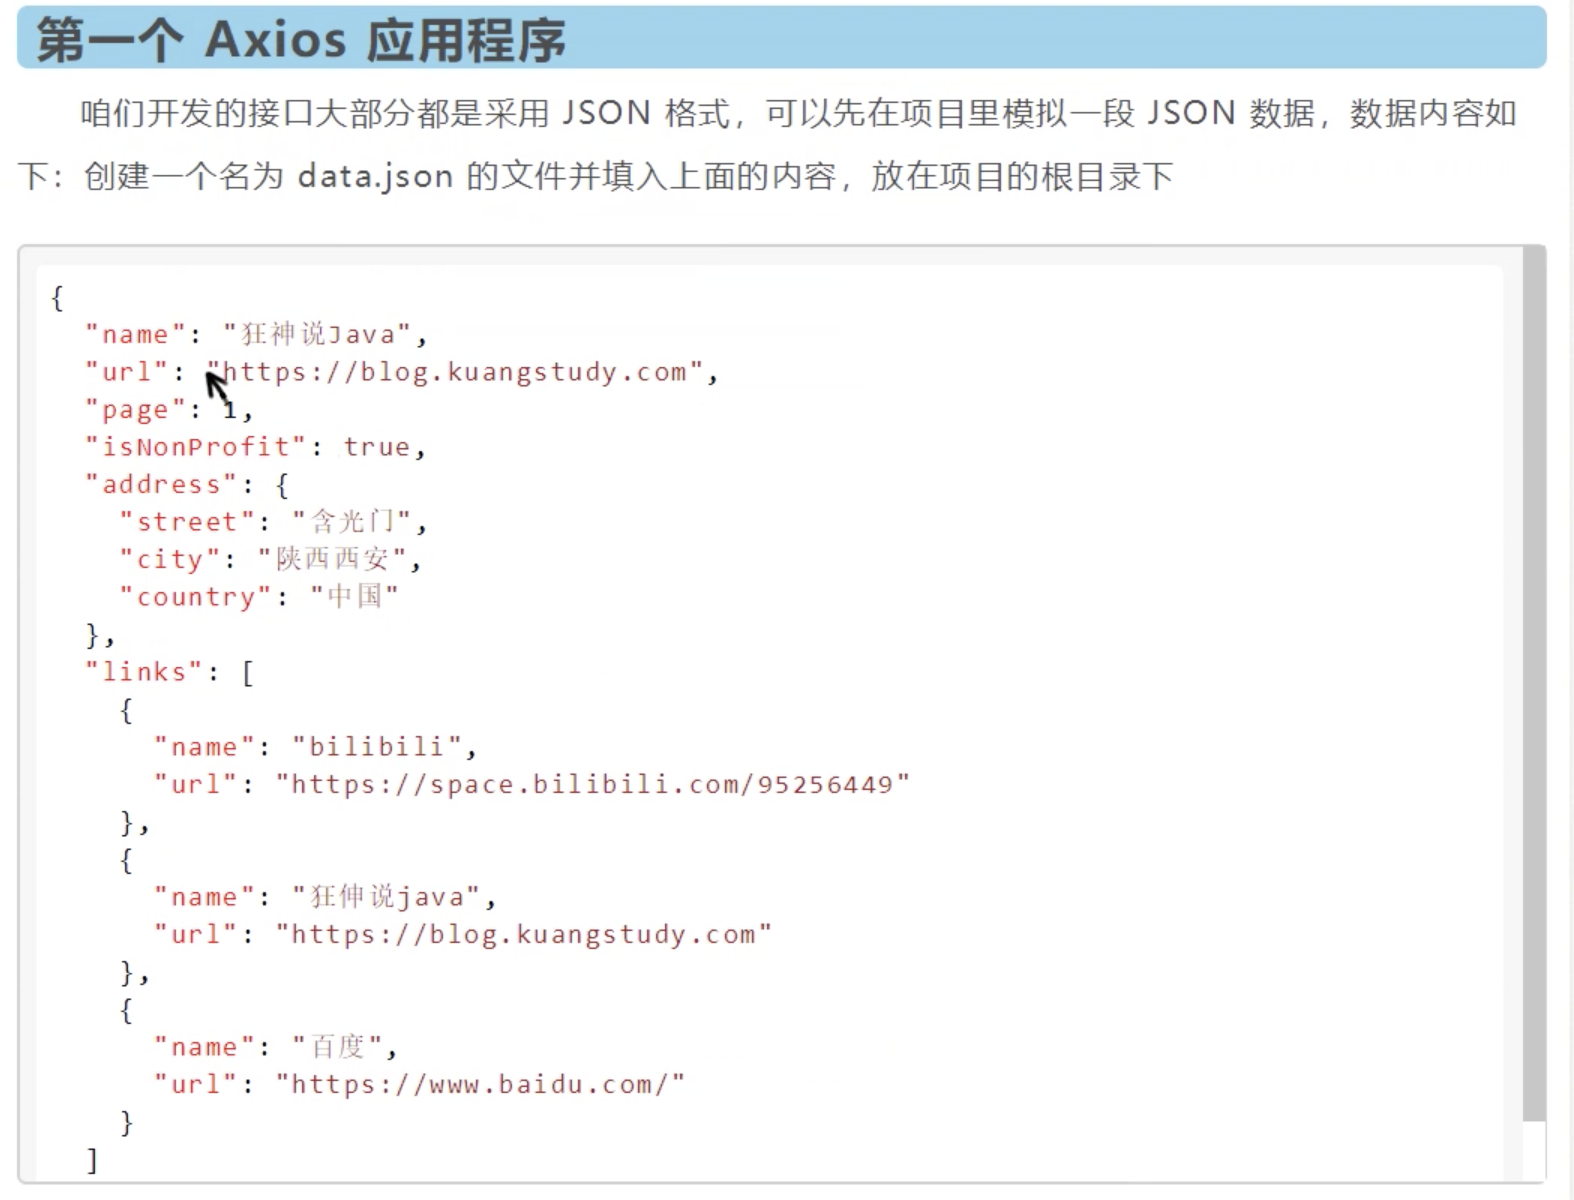
<div id="vue">
    <div>{{info.name}}</div>
    <div>{{info.address.street}}</div>
    <div>{{info.address.city}}</div>
    <div>{{info.address.country}}</div>
    <a v-bind:href="info.url">点我</a>

</div>

<script type="text/javascript">
    var vm = new Vue({
        el: "#vue",
        data(){//注意不是属性,是下面接收的json
            return {
                //请求的返回参数格式,必须和json字符串一样
                info: {
                    name: null,
                    url: null,
                    address: {
                        street: null,
                        city: null,
                        country: null
                    }
                }
            }
        },
        mounted(){//钩子函数 链式编程 ES6新特性
            axios.get('../data.json').then(response=>(this.info=response.data));
        }
    });

</script>
08 计算属性
计算出来的结果,保存在属性中

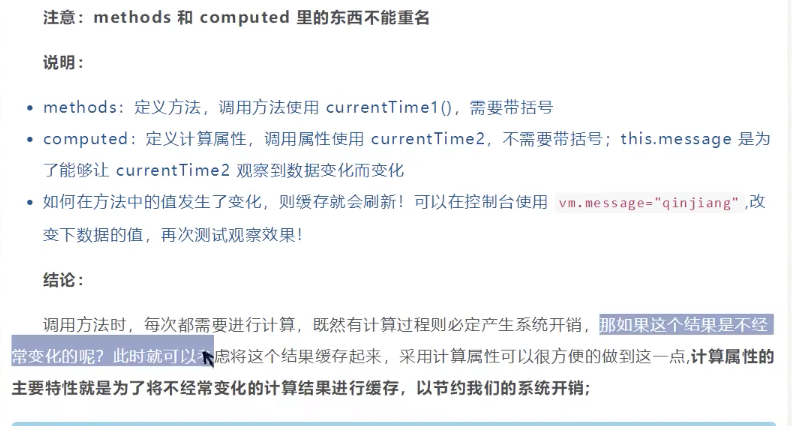
<div id="app" >
    <p>当前时间戳1 调用方式:currentTime1() {{currentTime1()}}</p>
    <p>当前时间戳2 调用方式:currentTime2 {{currentTime2}}</p>
</div>


<script>
    var vm = new Vue({
        el: "#app",
        data:{
            message:"hello,vue"
        },
        methods:{
            currentTime1: function () {
                return Date.now();
            }
        },
        computed:{//计算属性 注意methods和computed:不能重名
            currentTime2: function () {
                return Date.now();
            }
        }
    });

</script>
09 插槽
<div id="app" >
    <todo>
        <todo-title slot="todo-title" v-bind:title="title"></todo-title>
        <todo-item slot="todo-item" v-for="item in items" v-bind:item="item"></todo-item>
    </todo>
</div>


<script>
    Vue.component('todo',{
        template:
            '<div><slot name="todo-title"></slot>\
            <ul><slot name="todo-item"></slot>\
            </ul>\
            </div>'
    });

    Vue.component('todo-title',{
        props: ['title'],
        template: '<div>{{title}}</div>'
    });

    Vue.component('todo-item',{
        props: ['item'],
        template: '<li>{{item}}</li>'
    });


    var vm = new Vue({
        el: "#app",
        data: {
            title: '书籍列表',
            items: ['Java', 'Python', 'Linux']
        }
    });

</script>
10 自定义事件
<!DOCTYPE html>
<html lang="en" xmlns:v-bind="http://www.w3.org/1999/xhtml">
<head>
    <meta charset="UTF-8">
    <title>Title</title>
    <script src="https://cdn.jsdelivr.net/npm/vue/dist/vue.js"></script>

</head>
<body>
<h1>Hello, Vue</h1>

<div id="app" >
    <todo>
        <todo-title slot="todo-title" v-bind:title="title"></todo-title>
        <todo-item slot="todo-item" v-for="item,index in items"
                   :item="item" :index="index"
                    v-on:remove="removeItems(index)"
                    :key="index">
        </todo-item><!-- 通过这里的 v-on:remove="removeItems(index) 自定义事件remove,绑定到vm实例中的removeItems方法-->
    </todo>
</div>


<script>
    Vue.component('todo',{
        template:
            '<div><slot name="todo-title"></slot>\
            <ul><slot name="todo-item"></slot>\
            </ul>\
            </div>'
    });

    Vue.component('todo-title',{
        props: ['title'],
        template: '<div>{{title}}</div>'
    });

    Vue.component('todo-item',{
        props: ['item', 'index'],
        //template中 只能绑定当前组件的方法remove,没法绑定下面vm对象的methods中的removeItems
        template: '<li>{{item}},index:{{index}}<button @click="remove">删除</button></li>',
        methods: {
            remove: function (index) {
                this.$emit('remove', index);//调用自定义事件remove,传递参数index
            }
        }
    });


    var vm = new Vue({
        el: "#app",
        data: {
            title: '书籍列表',
            items: ['Java', 'Python', 'Linux']
        },
        methods: {
            removeItems: function (index) {
                console.log("删除了"+this.items[index]);
                this.items.splice(index, 1);//删除当前元素
            }
        }
    });

</script>

</body>
</html>
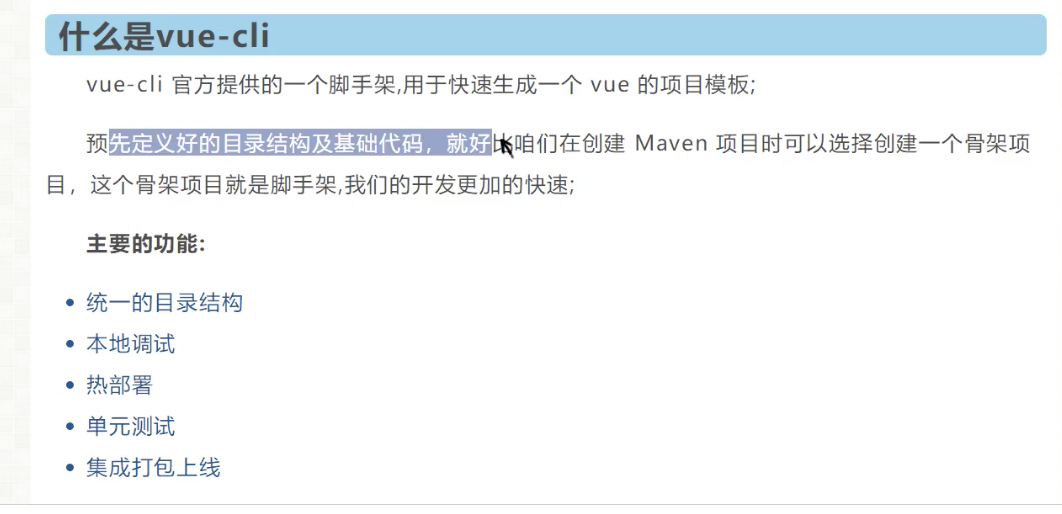
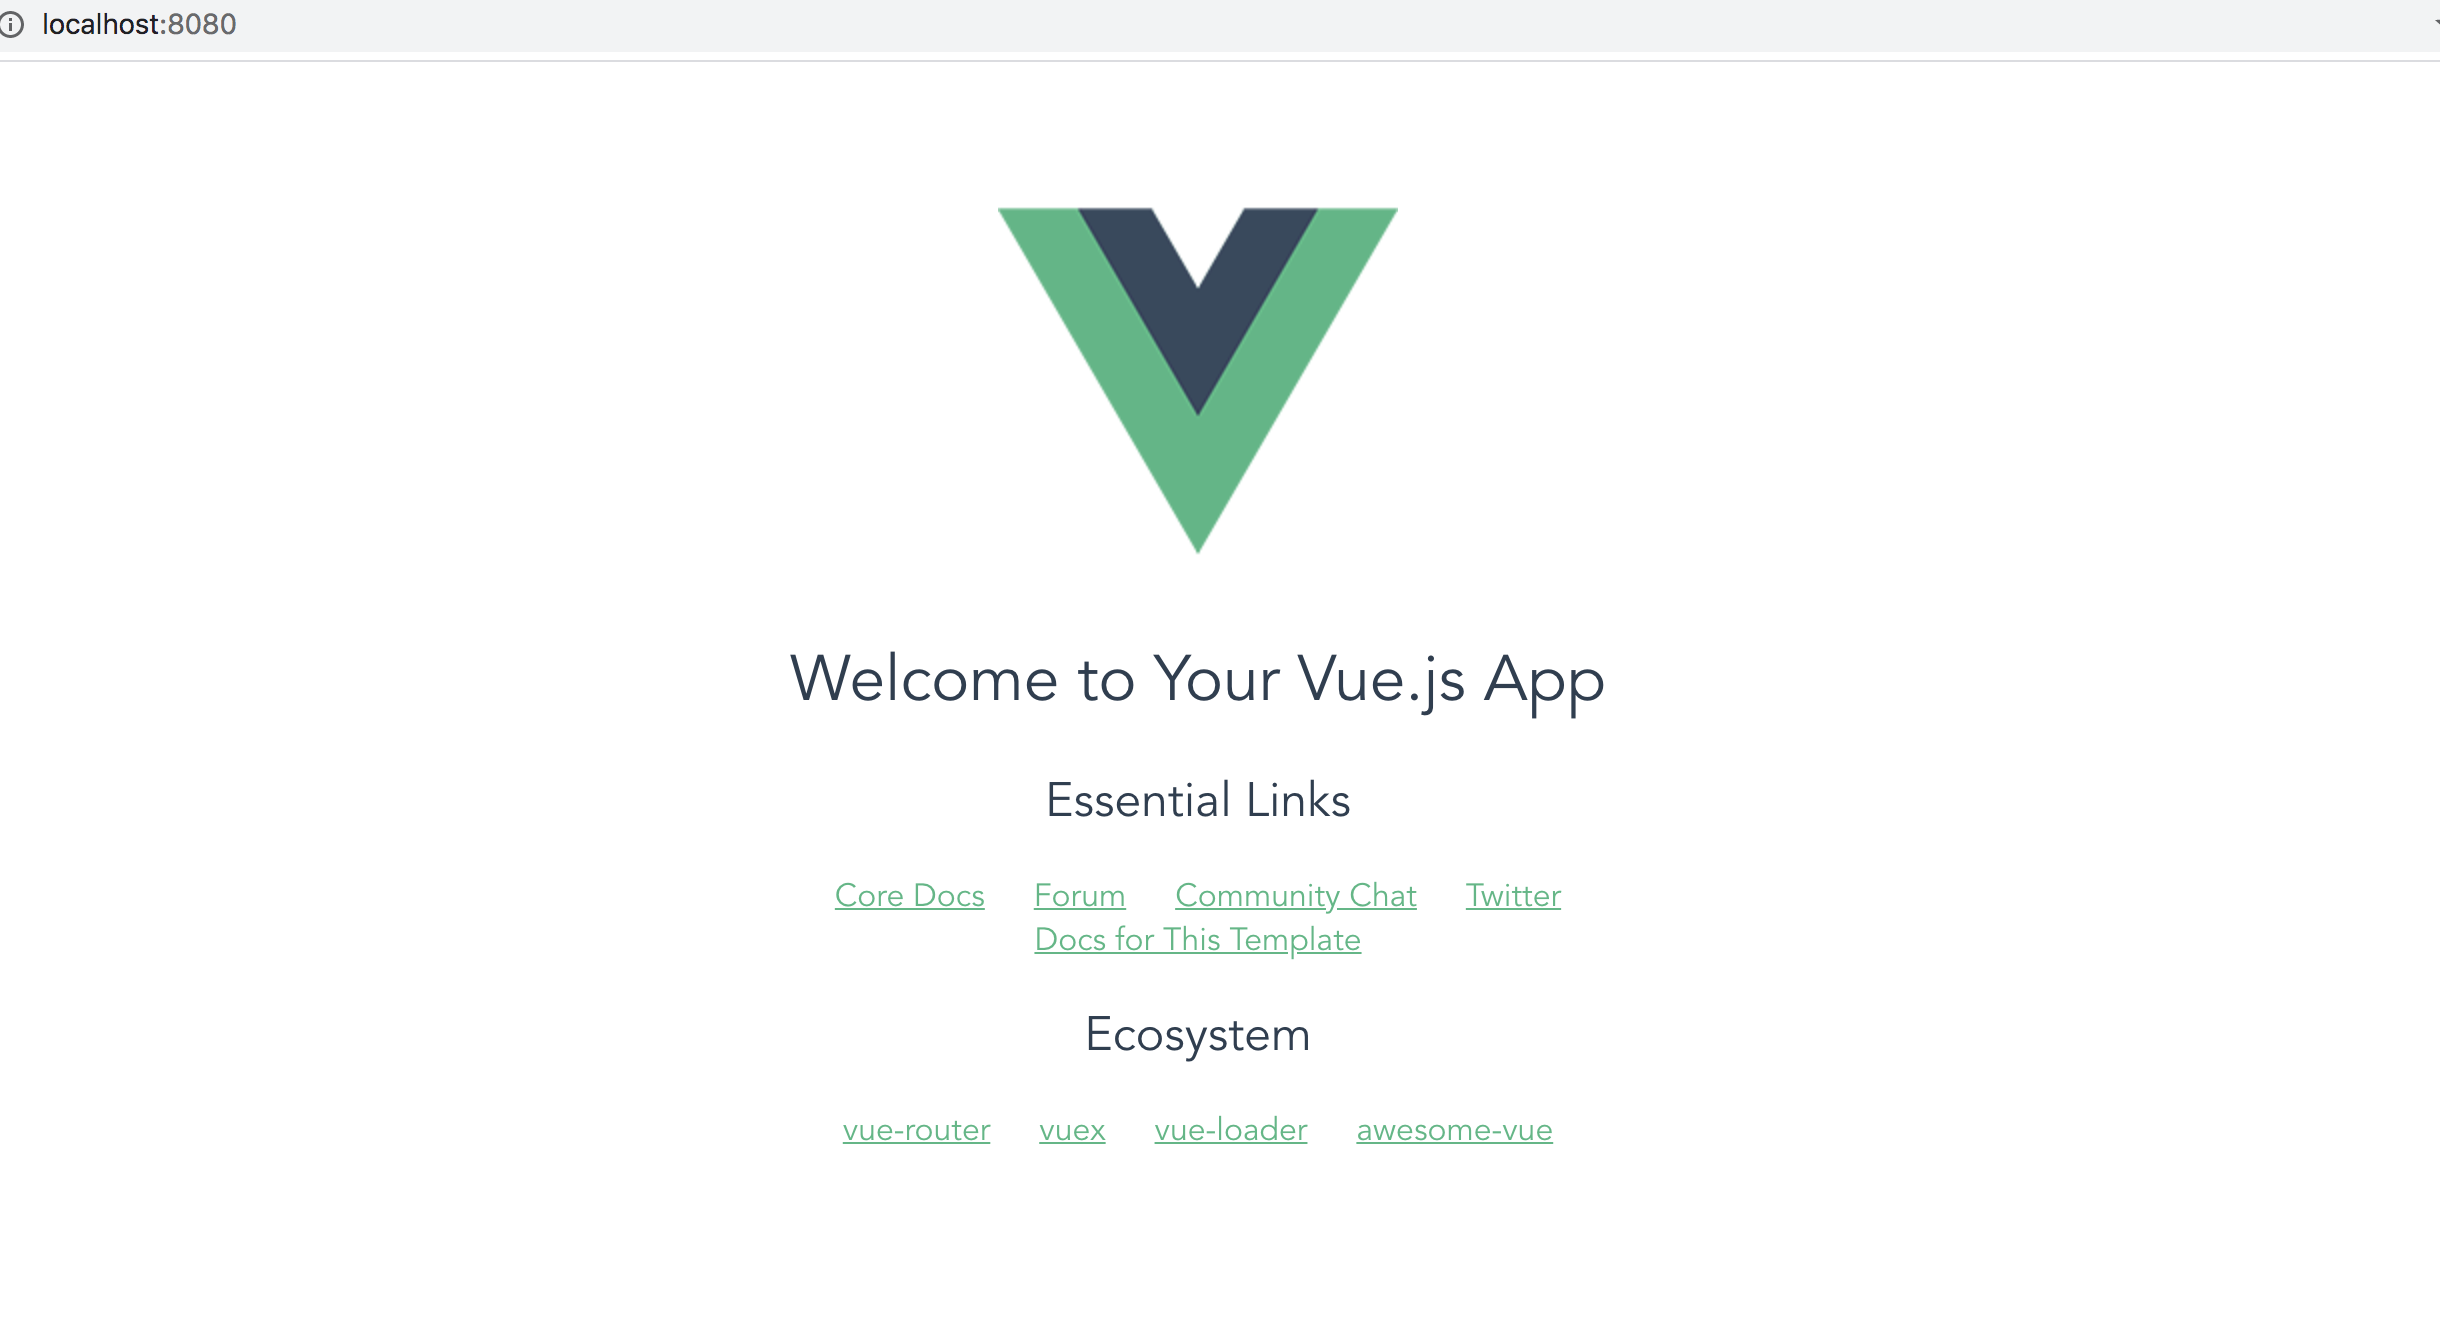
11 第一个vue-cli项目
[安装node]
(https://www.cnblogs.com/leolovexx/p/8534427.html)
然后安装cnpm
npm install cnpm -g
安装node后,安装vue-cli和webpack
cnpm install vue-cli -g
可以通过vue list查看可以创建的项目
到工作路径下初始化一个webpack项目myvue
vue init webpack myvue
然后配置参数

然后进入工作目录,配置依赖,启动,访问8080端口
cd myvue
npm install
npm run dev
就可以看到首页了
注:
可以通过nvm管理node
nvm use version 即可使用某个node环境
参考:nvm常用命令
解决vue list vue-cli报错的问题:
https://blog.csdn.net/weixin_40089510/article/details/85936724
12 Webpack学习
安装webpack
npm install webpack -g
npm install webpack-cli -g
测试webpack
webpack -v
webpack-cli -v
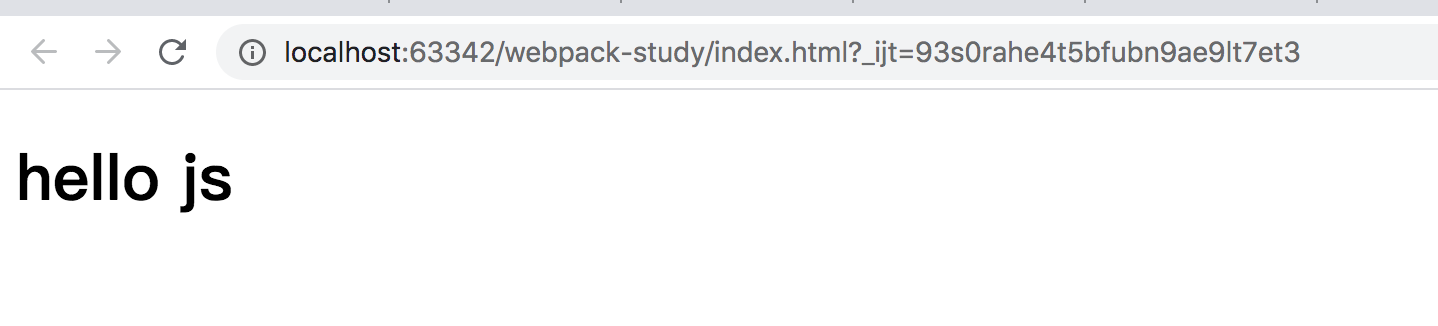
创建一个空项目,创建目录directory,在directory下new一个hello.js和 main.js
hello.js
//暴露一个方法
export function sayHi() {
        document.write("<h1>hello js</h1>");
}
main.js
import {sayHi} from "./hello";

//require("./hello");
sayHi();
在项目路径下创建webpack.config.js
module.exports = {
    entry: './modules/main.js',//程序入口
    output: {
        filename: "./js/bundle.js"//输出到
    }
};
到项目路径下执行webpack命令打包
打包完成后到项目路径下创建index.html
<!DOCTYPE html>
<html lang="en">
<head>
    <meta charset="UTF-8">
    <title>首页</title>
</head>
<body>
<script src="dist/js/bundle.js"></script>
</body>
</html>
浏览器运行
13 vue-router学习
官方路由
对于大多数单页面应用,都推荐使用官方支持的 vue-router 库。更多细节可以移步 vue-router 文档。
安装vue-router,并保存到dev配置
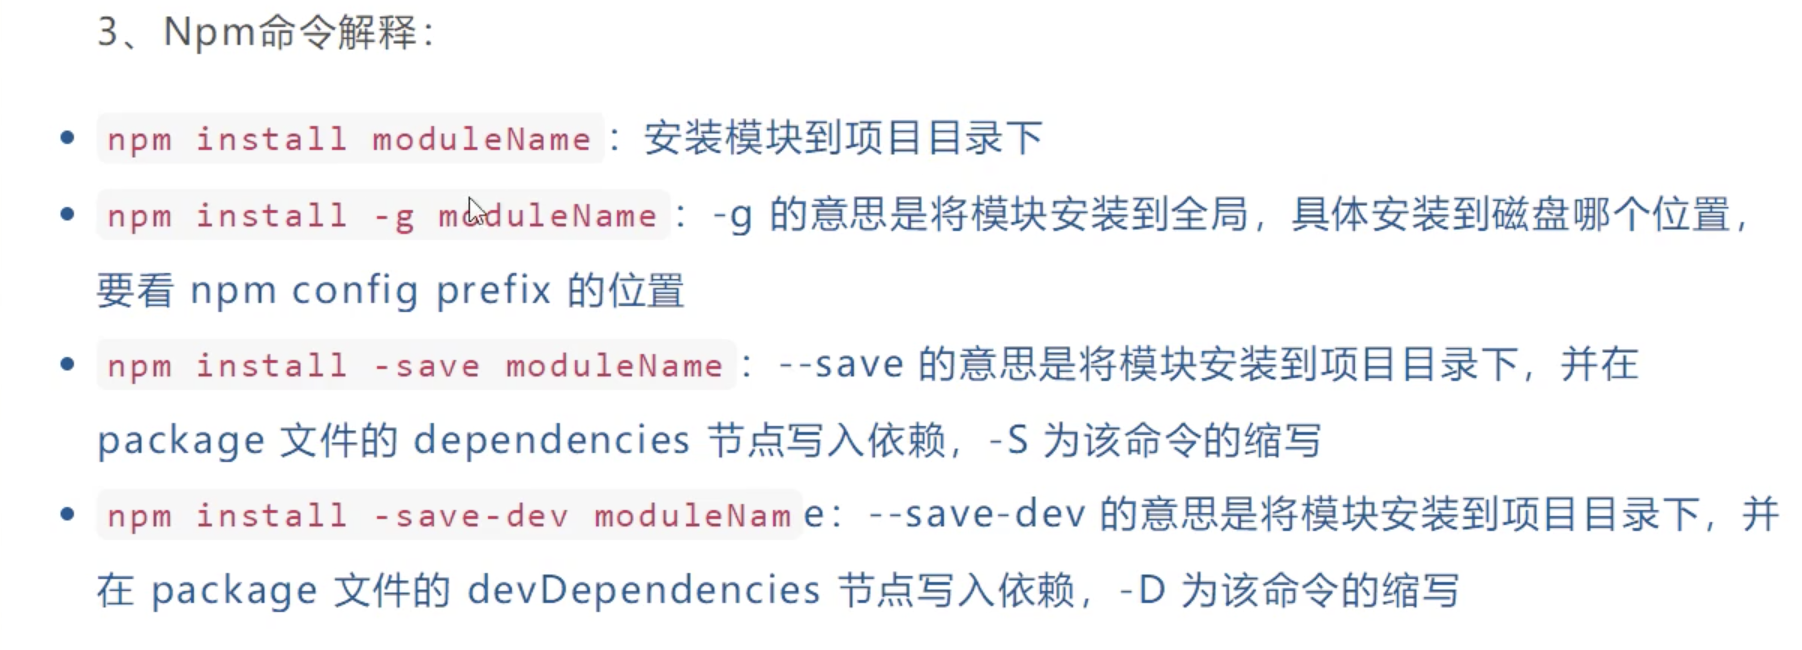
npm install vue-router --save-dev
14 Vue结合ElementUI
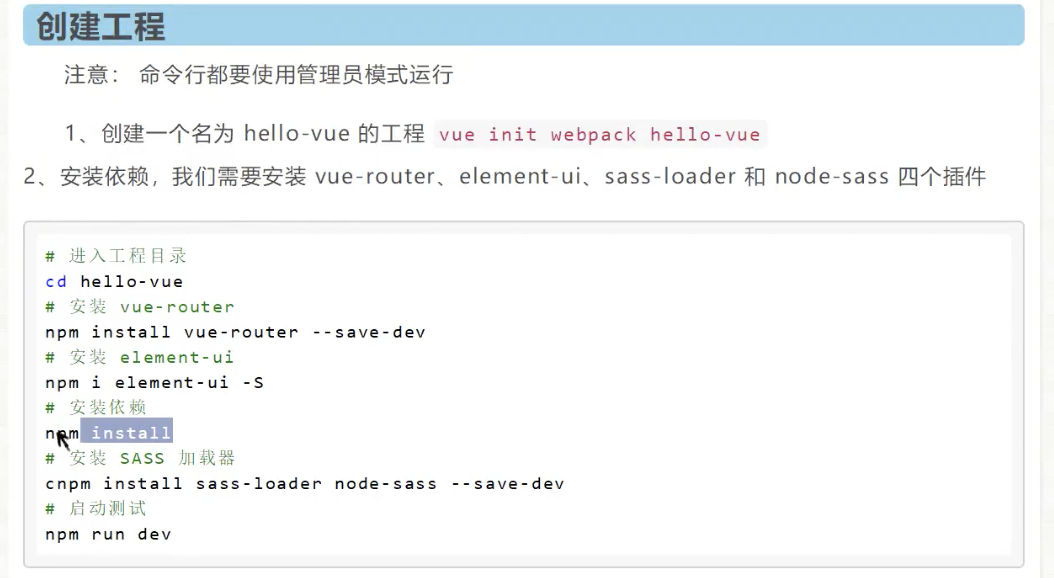
vue init webpack hello-vue
cd hello-vue
npm install vue-router --save-dev
cnpm i element-ui -S
npm install
cnpm install sass-loader node-sass --save-dev
npm run dev
参考https://www.jianshu.com/p/96143f0917aa
15 嵌套路由,传递参数
先在视图上绑定事件

嵌套路由:
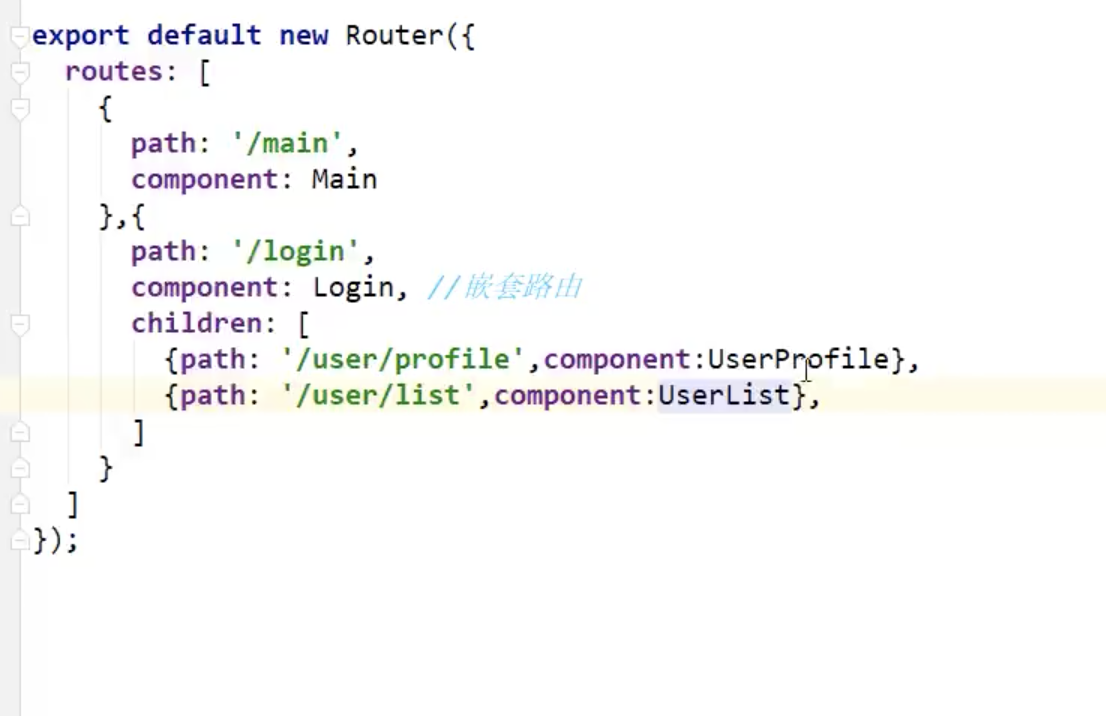
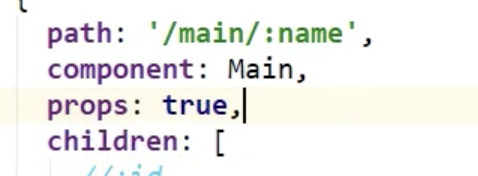
使用props传参解耦
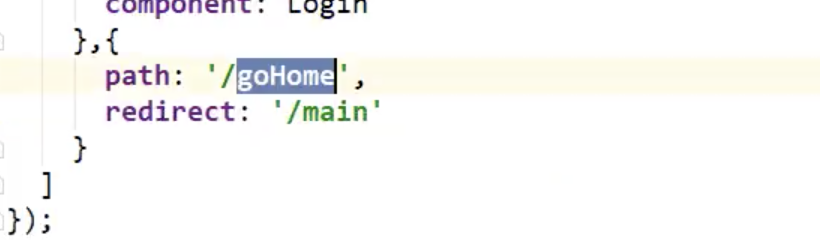
重定向:
16 路由模式与404
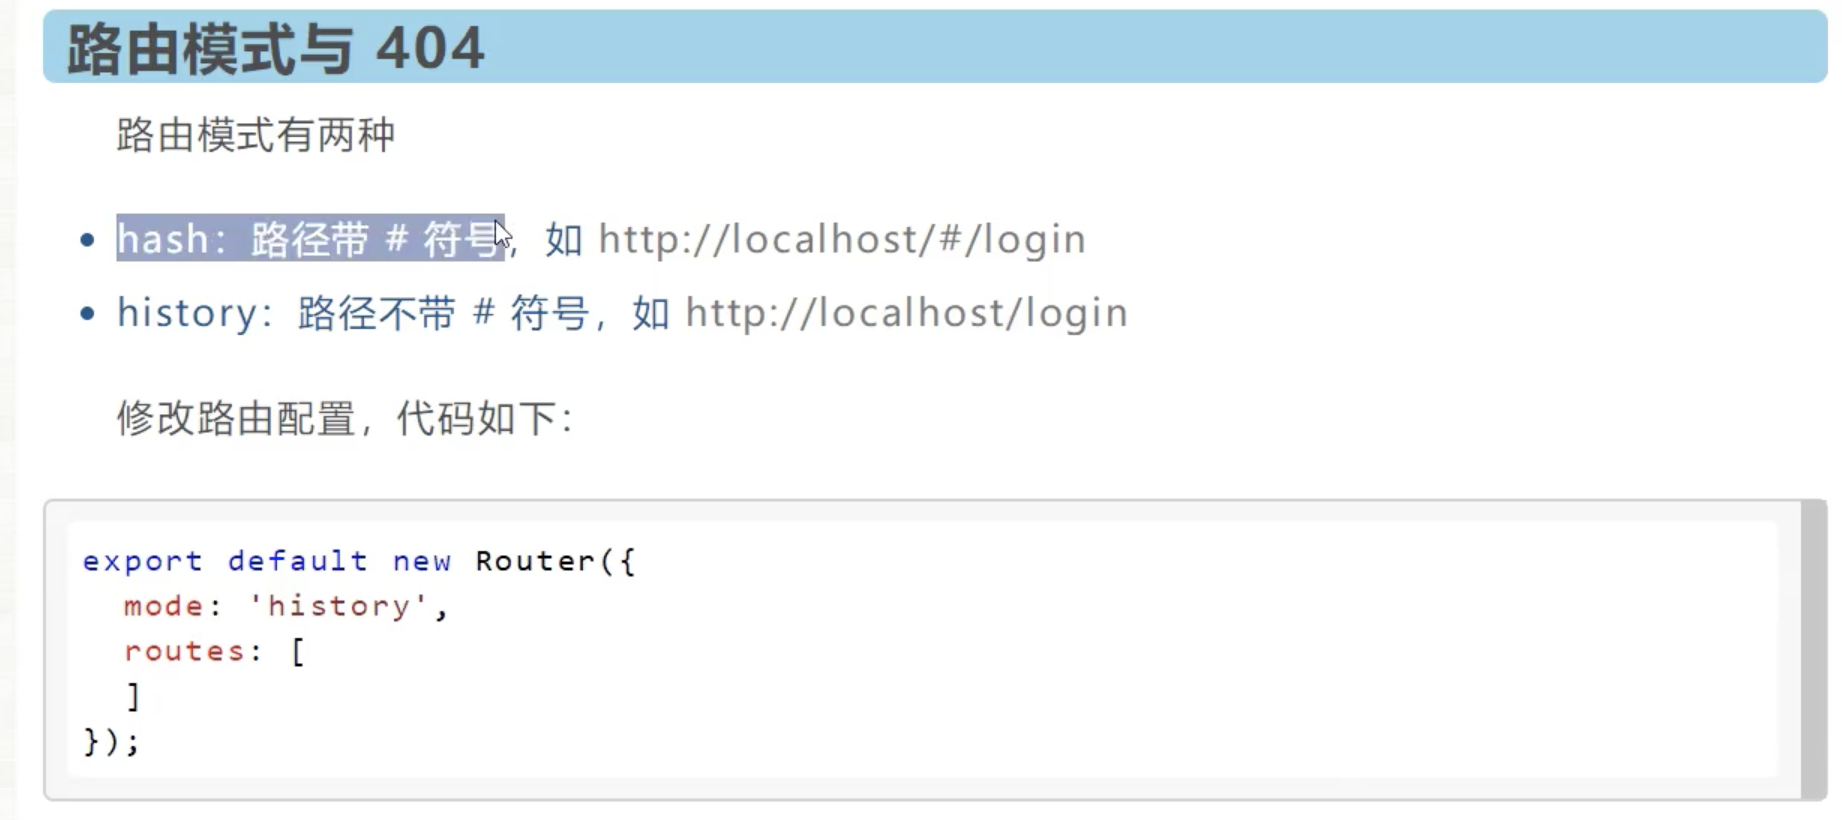
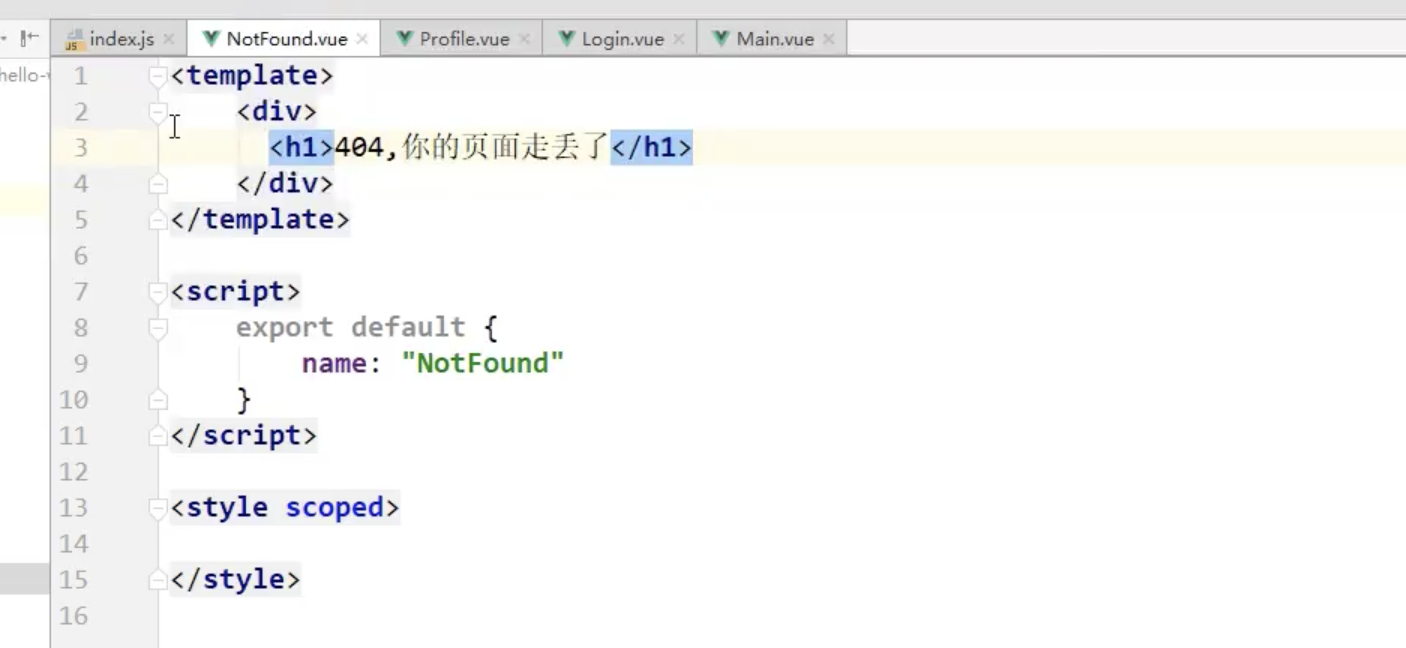
当出现404时,处理方式
创建一个NotFound.vue
配置路由

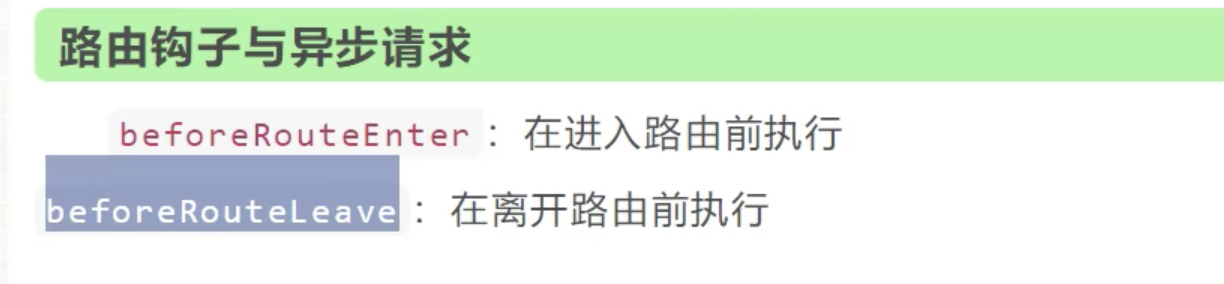
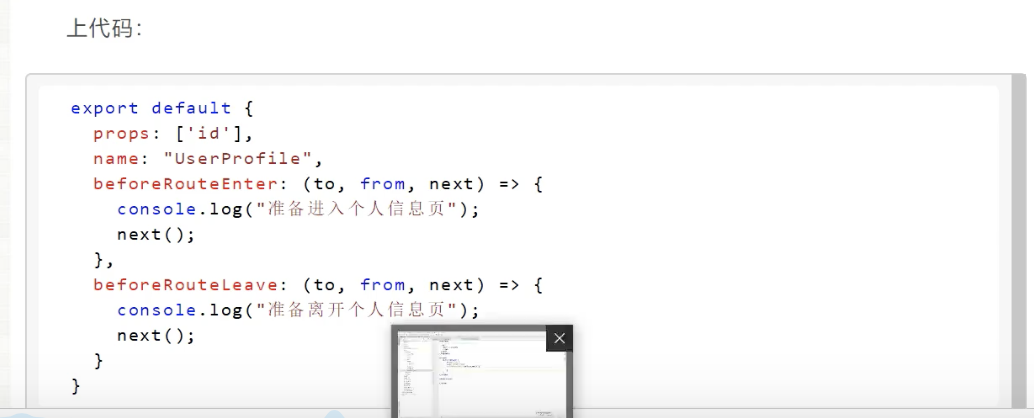
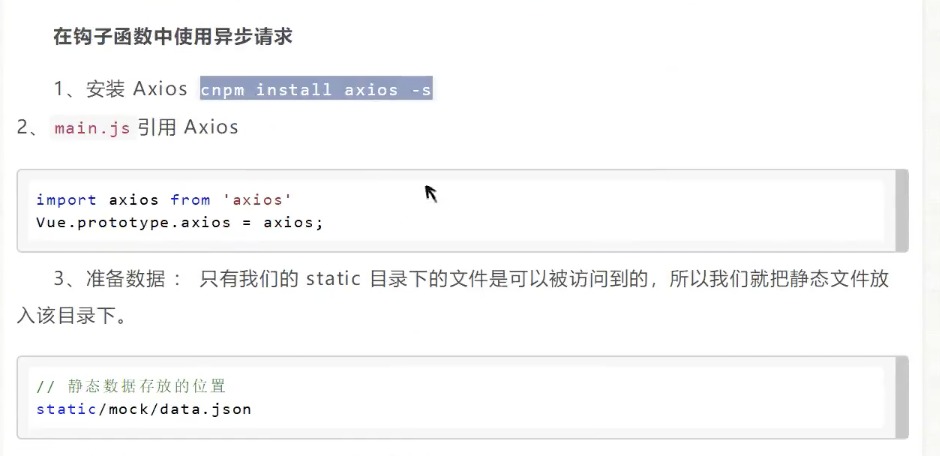
17 路由钩子