前三章用的是MyBatisPlus2.x,已经out了。。第四章才发现,笔记懒得改了
第一章 简介
1.1 MyBatisPlus介绍
MyBatis-Plus(简称 MP),是一个 MyBatis 的增强工具包,只做增强不做改变. 为简化开 发工作、提高生产率而生
愿景
我们的愿景是成为 MyBatis 最好的搭档,就像 魂斗罗 中的 1P、2P,基友搭配,效率翻倍。

1.2 代码及文档发布地址
官方地址:
http://mp.baomidou.com
代码发布地址:
Github: https://github.com/baomidou/mybatis-plus
Gitee: https://gitee.com/baomidou/mybatis-plus
文档发布地址: http://mp.baomidou.com/#/?id=%E7%AE%80%E4%BB%8。
1.3 前置知识
Spring
MyBatis
Maven
第二章 集成MyBatisPlus
2.1 建表
-- 创建库
CREATE DATABASE mp;
-- 使用库
USE mp;
-- 创建表
CREATE TABLE tbl_employee(
id INT(11) PRIMARY KEY AUTO_INCREMENT, last_name VARCHAR(50),
email VARCHAR(50),
gender CHAR(1),
age int );
INSERT INTO tbl_employee(last_name,email,gender,age) VALUES('Tom','tom@atguigu.com',1,22); INSERT INTO tbl_employee(last_name,email,gender,age) VALUES('Jerry','jerry@atguigu.com',0,25); INSERT INTO tbl_employee(last_name,email,gender,age) VALUES('Black','black@atguigu.com',1,30); INSERT INTO tbl_employee(last_name,email,gender,age) VALUES('White','white@atguigu.com',0,35);
2.2 创建Bean对象
我使用了generator生成器,然并卵。。原来MP可以都不用配置文件了。爽
2.3 添加依赖
在 pom.xml 中加入对 MP、Spring、连接池、Junit、Mysql 驱动等依赖
建立mybatis配置文件,spring配置文件,mysql配置文件,log4j配置文件等
applicationContext.xml
<?xml version="1.0" encoding="UTF-8"?>
<beans xmlns="http://www.springframework.org/schema/beans"
       xmlns:xsi="http://www.w3.org/2001/XMLSchema-instance"
       xmlns:context="http://www.springframework.org/schema/context"
       xmlns:tx="http://www.springframework.org/schema/tx"
       xmlns:mybatis-spring="http://mybatis.org/schema/mybatis-spring"
       xsi:schemaLocation="http://mybatis.org/schema/mybatis-spring http://mybatis.org/schema/mybatis-spring-1.2.xsd
		http://www.springframework.org/schema/beans http://www.springframework.org/schema/beans/spring-beans.xsd
		http://www.springframework.org/schema/context http://www.springframework.org/schema/context/spring-context-4.0.xsd
		http://www.springframework.org/schema/tx http://www.springframework.org/schema/tx/spring-tx-4.0.xsd">


    <!-- 数据源 -->
    <context:property-placeholder location="classpath:db.properties"/>
    <bean id="dataSource" class="com.mchange.v2.c3p0.ComboPooledDataSource">
        <property name="driverClass" value="${jdbc.driver}"></property>
        <property name="jdbcUrl" value="${jdbc.url}"></property>
        <property name="user" value="${jdbc.username}"></property>
        <property name="password" value="${jdbc.password}"></property>
    </bean>

    <!-- 事务管理器 -->
    <bean id="dataSourceTransactionManager"
          class="org.springframework.jdbc.datasource.DataSourceTransactionManager">
        <property name="dataSource" ref="dataSource"></property>
    </bean>
    <!-- 基于注解的事务管理 -->
    <tx:annotation-driven transaction-manager="dataSourceTransactionManager"/>


    <!--  配置SqlSessionFactoryBean
        Mybatis提供的: org.mybatis.spring.SqlSessionFactoryBean
        MP提供的:com.baomidou.mybatisplus.spring.MybatisSqlSessionFactoryBean
     -->
    <bean id="sqlSessionFactoryBean" class="com.baomidou.mybatisplus.spring.MybatisSqlSessionFactoryBean">
        <!-- 数据源 -->
        <property name="dataSource" ref="dataSource"></property>
        <property name="configLocation" value="classpath:mybatis-config.xml"></property>
        <!-- 别名处理 -->
        <property name="typeAliasesPackage" value="com.atguigu.mp.beans"></property>

        <!-- 注入全局MP策略配置 -->
        <property name="globalConfig" ref="globalConfiguration"></property>
    </bean>

    <!-- 定义MybatisPlus的全局策略配置-->
    <bean id="globalConfiguration" class="com.baomidou.mybatisplus.entity.GlobalConfiguration">
        <!-- 在2.3版本以后,dbColumnUnderline 默认值就是true -->
        <property name="dbColumnUnderline" value="true"></property>

        <!-- 全局的主键策略 -->
        <property name="idType" value="0"></property>
        <!-- 全局的表前缀策略配置 -->
        <property name="tablePrefix" value="tbl_"></property>

    </bean>


    <!--
        配置mybatis 扫描mapper接口的路径
     -->
    <bean class="org.mybatis.spring.mapper.MapperScannerConfigurer">
        <property name="basePackage" value="com.atguigu.mp.mapper"></property>
    </bean>


</beans>
重点是SQLSessionFactoryBean的class是类MybatisSqlSessionFactoryBean,就集成了MyBatisPlus
第三章 入门 HelloWorld
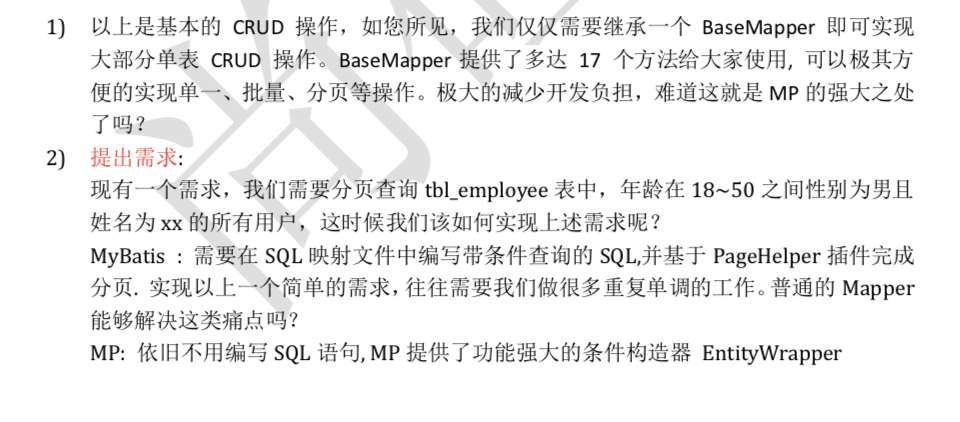
3.1 通用CRUD
- 提出问题:
假设我们已存在一张 tbl_employee 表,且已有对应的实体类 Employee,实现 tbl_employee 表的 CRUD 操作我们需要做什么呢? - 实现方式: 基于 Mybatis
需要编写 EmployeeMapper 接口,并手动编写 CRUD 方法
提供 EmployeeMapper.xml 映射文件,并手动编写每个方法对应的 SQL 语句. 基于 MP
只需要创建 EmployeeMapper 接口, 并继承 BaseMapper 接口.这就是使用 MP 需要完成的所有操作,甚至不需要创建 SQL 映射文件! 美滋滋
3.2 插入操作
- Integer insert(T entity);
- @TableName
用于设置表名 - 全局的 MP 配置:
- @TableField
其有一个属性exist默认为true,如果数据库中没有该字段,需要设置为false - 全局的 MP 配置:
- @TableId
- 全局的 MP 配置:
- 支持主键自增的数据库插入数据获取主键值
Mybatis: 需要通过 useGeneratedKeys 以及 keyProperty 来设置
MP: 自动将主键值回写到实体类中 - Integer insertAllColumn(T entity)
不管属性是否为空,都会将对应的属性写到insert子句要插入的字段中,所有字段都用占位符进行占位
在application.xml配置的全局MyBatisPlus策略,记得注入sqlSessionFactoryBean的属性
    <!--    定义MyBatisPlus的全局策略配置-->
    <bean id="globalConfiguration" class="com.baomidou.mybatisplus.entity.GlobalConfiguration">
                <!-- 在2.3版本以后,dbColumnUnderline 默认值就是true -->
        <property name="dbColumnUnderline" value="true"></property>
<!--                全局的主键策略-->
        <property name="idType" value="0"></property>

<!--                全局的表前缀配置-->
        <property name="tablePrefix" value="tbl_"></property>

    </bean>
3.3 更新操作
- Integer updateById(@Param("et") T entity);
会根据entity非空值修改,空值不会修改,不会写到sql语句中 - Integer updateAllColumnById(@Param("et") T entity)
会把entity的所有属性都注入sql语句中,属性为null插入也为空值
3.4 查询操作
- T selectById(Serializable id);
根据id查询 - T selectOne(@Param("ew") T entity);
根据给定的属性进行查询,只能最多查出一条结果
 @Test
    public void testSelectOne(){
        Employee employee = new Employee();
        employee.setId(8);
        employee.setLastName("gao");
        Employee employee1 = employeeMapper.selectOne(employee);
        System.out.println(employee1);
    }
DEBUG 07-25 15:53:59,525 ==> Preparing: SELECT id,last_name AS lastName,email,gender,age FROM tbl_employee WHERE id=? AND last_name=? (JakartaCommonsLoggingImpl.java:54)
- List
selectBatchIds(List<? extends Serializable> idList);
根据多个id查询结果
- List
selectByMap(@Param("cm") Map<String, Object> columnMap);
@Test
    public void testByMap(){
        Map<String, Object> map = new HashMap<>();
        //注意要写表中的字段名,不能写bean的属性名
        map.put("last_name", "gao");
        map.put("gender", "1");
        List<Employee> employees = employeeMapper.selectByMap(map);
        employees.forEach(System.out::println);

    }
DEBUG 07-25 16:02:46,769 ==> Preparing: SELECT id,last_name AS lastName,email,gender,age FROM tbl_employee WHERE gender = ? AND last_name = ? (JakartaCommonsLoggingImpl.java:54)
- List
selectPage(RowBounds rowBounds, @Param("ew") Wrapper wrapper);
@Test
    public void testSelectPage(){
        List<Employee> employees = employeeMapper.selectPage(new Page<>(2,2), null);
        employees.forEach(System.out::println);
    }
3.5 删除操作
- Integer deleteById(Serializable id);
根据id删除 - Integer deleteByMap(@Param("cm") Map<String, Object> columnMap);
根据属性删除,匹配到的所有记录都可以删除 - Integer deleteBatchIds(List<? extends Serializable> idList);
根据id批量删除
3.6 MP启动注入SQL原理分析
当xxxMapper集成了BaseMapper
前置知识:MyBatis源码中比较重要的一些对象,MyBatis框架的执行流程
debug启动后分析
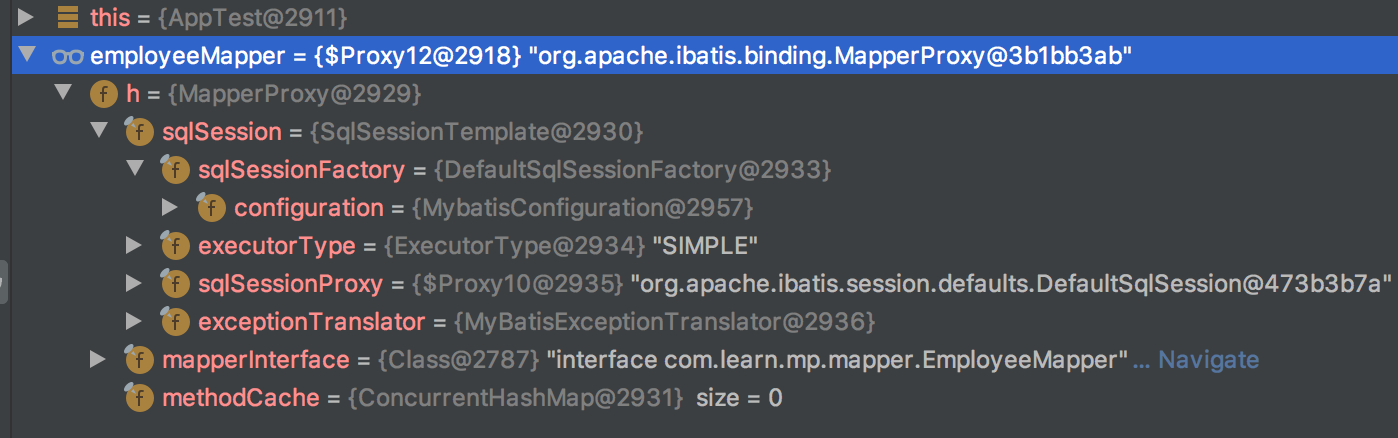
自定义的EmployeeMapper实际上是一个MapperProxy对象
在MapperProxy定义了一个属性private final SqlSession sqlSession;
SqlSessionFactory中有Configuration对象,是MyBatis的全局配置类
Configuration对象内的属性mappedStatements存放了所有的方法
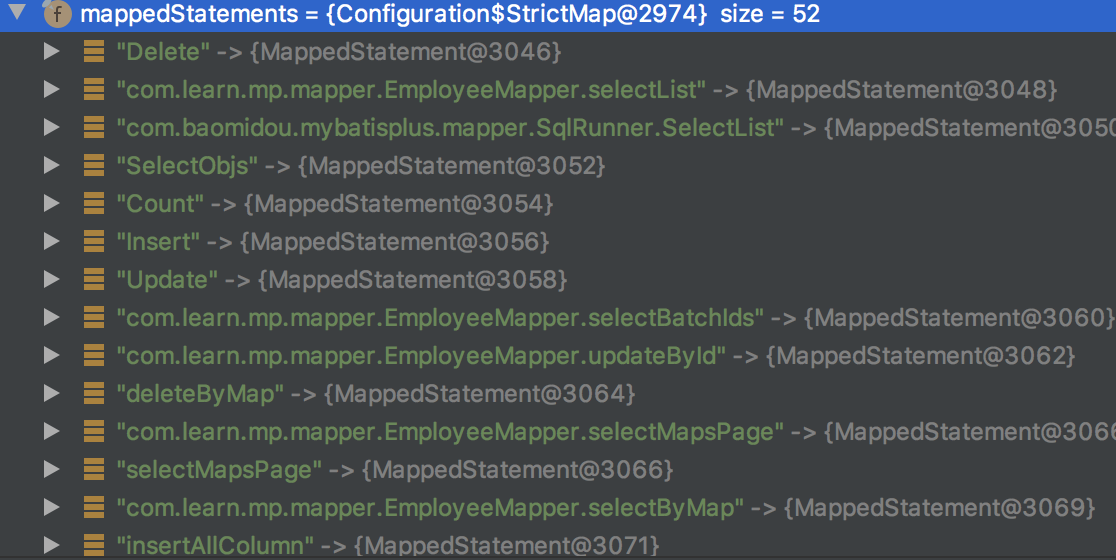
每一个mapper接口中的方法对应了对象mappedStatements的一个属性,即对应Mapper映射文件的一个sql语句
MP在启动就会挨个分析mapper接口中的方法,并生成对应的sql语句
以deleteById方法为例
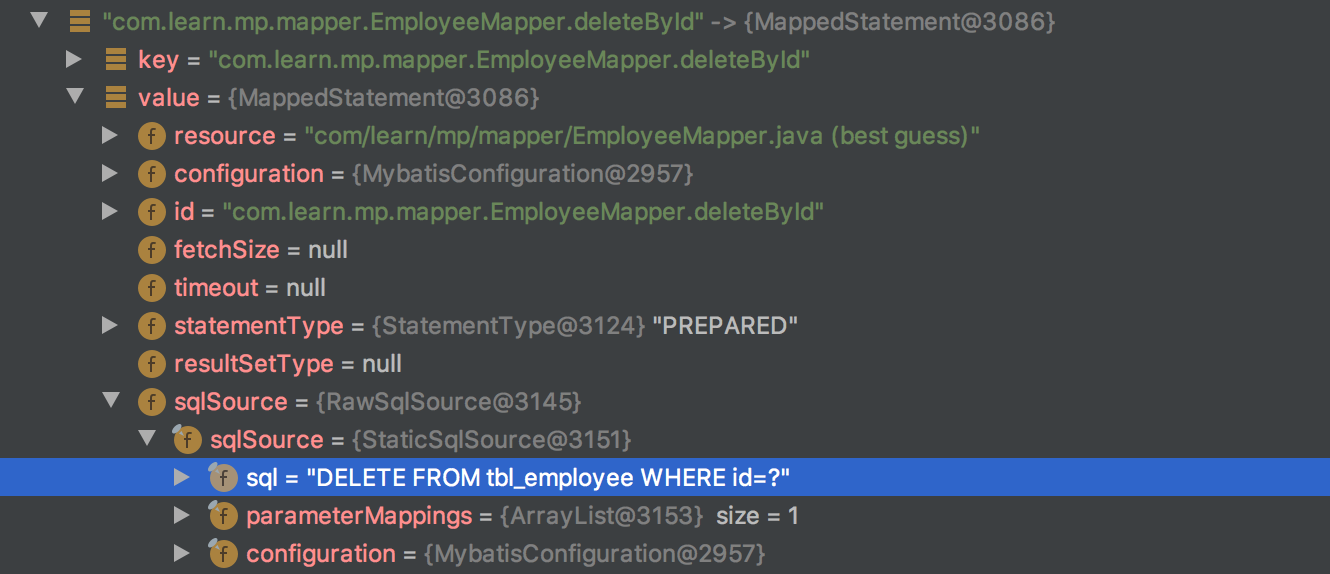
在sqlSource中存放了预编译的sql语句
在启动日志中可以看到生成mappedStatement:
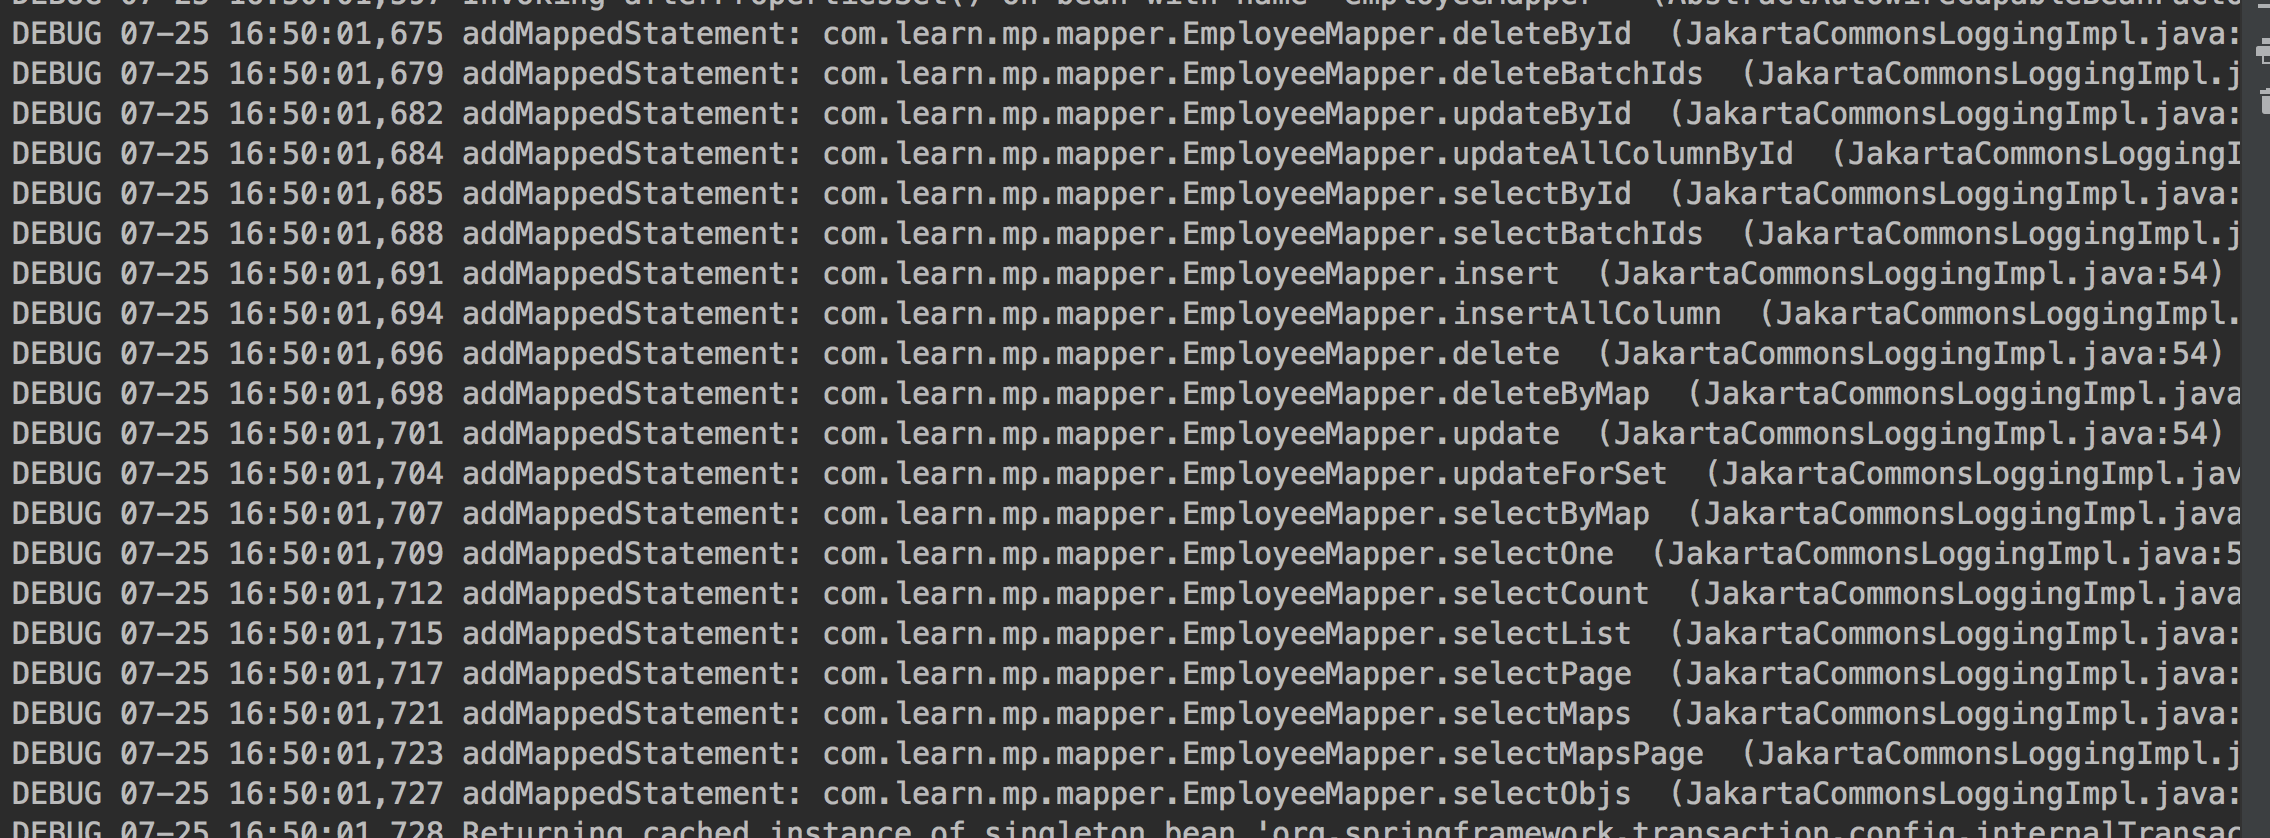
Configuration: MyBatis 或者 MP 全局配置对象
MappedStatement:一个 MappedStatement 对象对应 Mapper 配置文件中的一个 select/update/insert/delete 节点,主要描述的是一条 SQL 语句
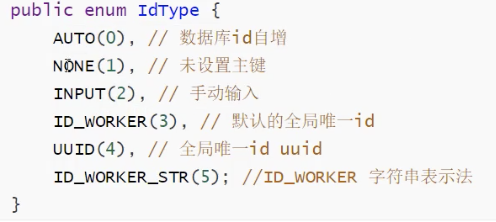
SqlMethod : 枚举对象 ,MP 支持的 SQL 方法
TableInfo:数据库表反射信息 ,可以获取到数据库表相关的信息 SqlSource: SQL 语句处理对象
MapperBuilderAssistant: 用于缓存、SQL 参数、查询结果集处理等.
通过 MapperBuilderAssistant 将每一个 mappedStatement 添加到 configuration 中的 mappedstatements 中
3.7 小结
第四章 MP3.0.5学习
学到这里才发现EntityWrapper已经out了。。于是找了另外的视频看。。
下面基于SpringBoot整合MyBatisPlus
注意mysql连接时配置时区参数:useJDBCCompliantTimezoneShift=true&useLegacyDatetimeCode=false&serverTimezone=UTC
1.快速开始(参考官方文档):
添加依赖:
<dependencies>

<!--		mysql-->
		<dependency>
			<groupId>mysql</groupId>
			<artifactId>mysql-connector-java</artifactId>
		</dependency>

<!--		lombok-->
		<dependency>
			<groupId>org.projectlombok</groupId>
			<artifactId>lombok</artifactId>
<!--			<version>1.18.12</version>-->
		</dependency>

<!--		mybatisPlus-->
        <dependency>
            <groupId>com.baomidou</groupId>
            <artifactId>mybatis-plus-boot-starter</artifactId>
            <version>3.0.5</version>
        </dependency>

<!--		 SpringBoot起步依赖-->
		<dependency>
			<groupId>org.springframework.boot</groupId>
			<artifactId>spring-boot-starter</artifactId>
		</dependency>


		<dependency>
			<groupId>org.springframework.boot</groupId>
			<artifactId>spring-boot-starter-test</artifactId>
			<scope>test</scope>
			<exclusions>
				<exclusion>
					<groupId>org.junit.vintage</groupId>
					<artifactId>junit-vintage-engine</artifactId>
				</exclusion>
			</exclusions>
		</dependency>
	</dependencies>
配置mysql
spring.datasource.url=jdbc:mysql://xxx:3306/mp?useUnicode=true&characterEncoding=utf8&serverTimezone=GMT%2B8
#${jdbc.url}
#useJDBCCompliantTimezoneShift=true&useLegacyDatetimeCode=false&serverTimezone=GMT%2B8
spring.datasource.password=xxx
spring.datasource.driver-class-name=com.mysql.cj.jdbc.Driver
spring.datasource.username=root
编写pojo
@Data
@NoArgsConstructor
@AllArgsConstructor
public class User {
    private Integer id;
    private String name;
    private Integer age;
    private String email;
}
编写UserMapper继承BaseMapper
@Repository//代表持久层
public interface UserMapper extends BaseMapper<User> {
}
2.配置日志
控制台输出
mybatis-plus.configuration.log-impl=org.apache.ibatis.logging.stdout.StdOutImpl
3.主键生成策略

4.设置自动填充处理
自动填充数据库的字段create_time和update_time
代码级别:
在字段上加注解
    @TableField(fill = FieldFill.INSERT)//插入时更新
    private Date createTime;

    @TableField(fill = FieldFill.INSERT_UPDATE)//插入和更新时操作
    private Date updateTime;
然后写处理器,实现MetaObjectHandler接口,重写插入和更新时的填充策略
MP基于3.0.5版本,注意该方法在新版本过时
@Slf4j
@Component//需要将处理器交给Spring管理
public class UserDateHandler implements MetaObjectHandler {
    @Override
    public void insertFill(MetaObject metaObject) {
        log.info("start insert fill");
        //MetaObjectHandler setFieldValByName(String fieldName, Object fieldVal, MetaObject metaObject)
        //自动填充字段
        this.setFieldValByName("createTime", new Date(), metaObject);
        this.setFieldValByName("updateTime", new Date(), metaObject);
    }

    @Override
    public void updateFill(MetaObject metaObject) {
        log.info("start update fill");
        this.setFieldValByName("updateTime", new Date(), metaObject);
    }
}
5.乐观锁和悲观锁

增加一个字段version
    @Version//乐观锁的注解
    private Integer version;
然后注册组件,可以把MapperScan移到这里
@Configuration//配置类
@EnableTransactionManagement//开启事务管理,默认开启
@MapperScan(basePackages = "com.learn.mp.mapper")//扫描mapper接口
public class MyBatisConfig {

    //配置bean
    @Bean
    public OptimisticLockerInterceptor optimisticLockerInterceptor() {
        return new OptimisticLockerInterceptor();
    }

}
6.分页查询
1.导入分页插件配置
//Spring boot方式
@EnableTransactionManagement
@Configuration
@MapperScan("com.baomidou.cloud.service.*.mapper*")
public class MybatisPlusConfig {

    @Bean
    public PaginationInterceptor paginationInterceptor() {
        PaginationInterceptor paginationInterceptor = new PaginationInterceptor();
        // 设置请求的页面大于最大页后操作, true调回到首页,false 继续请求  默认false
        // paginationInterceptor.setOverflow(false);
        // 设置最大单页限制数量,默认 500 条,-1 不受限制
        // paginationInterceptor.setLimit(500);
        // 开启 count 的 join 优化,只针对部分 left join
        paginationInterceptor.setCountSqlParser(new JsqlParserCountOptimize(true));
        return paginationInterceptor;
    }
}
@Test
	void testPage(){
		Page<User> page = new Page<>(2, 2);
		IPage<User> userIPage = userMapper.selectPage(page, null);
		userIPage.getRecords().forEach(System.out::println);


	}
效率不高,先检索所有记录,再查询分页数据
7.逻辑删除
物理删除:从数据库中直接移除
逻辑删除:在数据库中没有被移除,而是通过一个变量让他失效!delete=0->delete=1
数据库中增加一个delete字段
实体类字段上加上@TableLogic注解
添加逻辑删除组件(注意最新版不需要)
    @Bean
    public ISqlInjector sqlInjector(){
        return new LogicSqlInjector();
    }
添加配置到主配置文件
#逻辑删除
mybatis-plus.global-config.db-config.logic-delete-value=1
mybatis-plus.global-config.db-config.logic-not-delete-value=0
8.性能分析插件
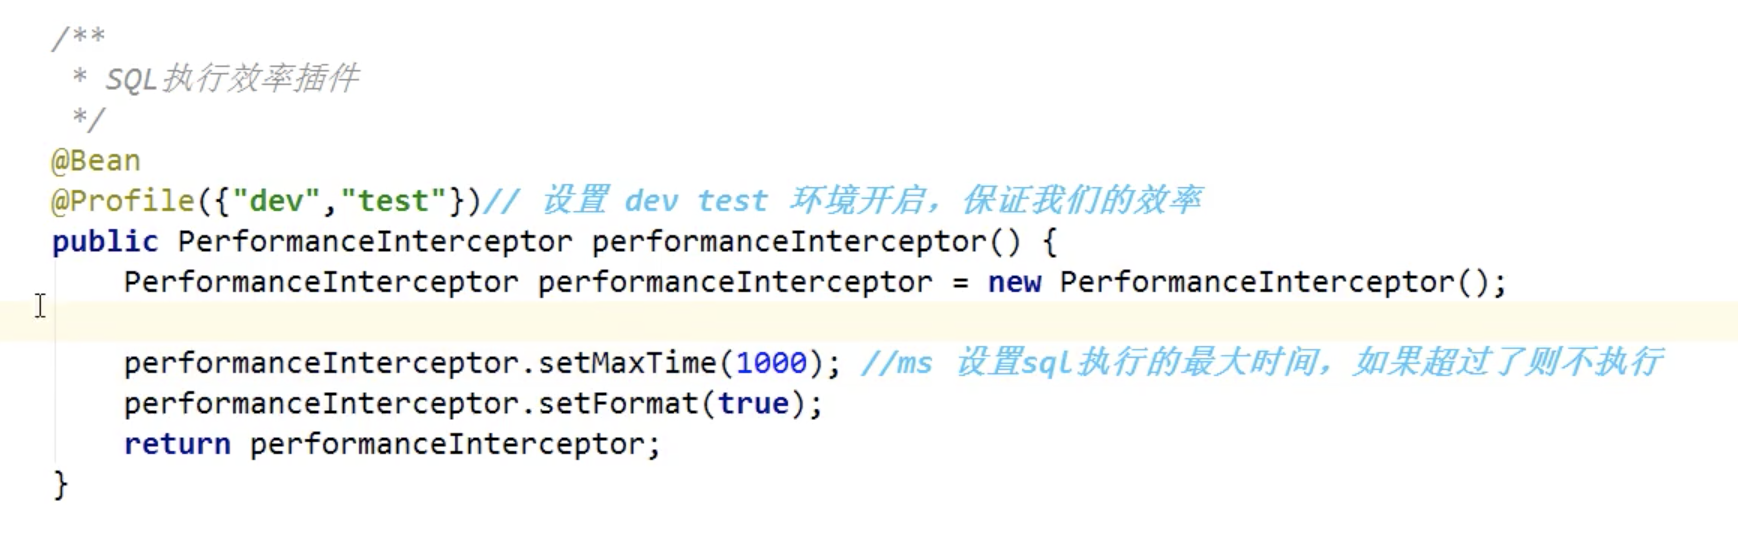
3.2.0新版本已经移除了。。建议使用p6spy
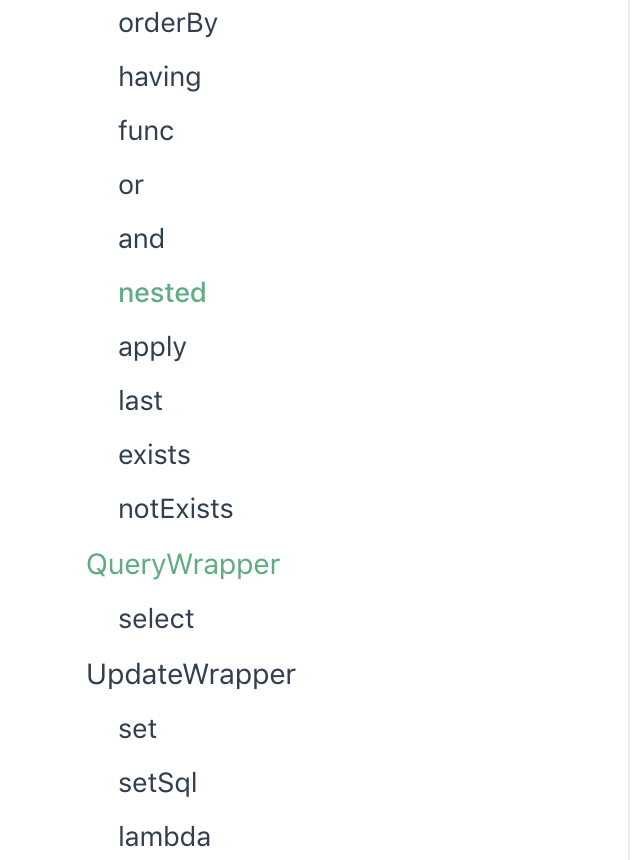
9.条件查询器Wrapper

@SpringBootTest
public class WrapperTest {
    @Autowired
    private UserMapper userMapper;

    @Test
    void contextLoads(){
        //查询name不为空,邮箱不为空,且年龄大于18
        QueryWrapper<User> userQueryWrapper = new QueryWrapper<>();
        userQueryWrapper.isNotNull("name").
                isNotNull("email").
                ge("age", 20);
        List<User> users =
                userMapper.selectList(userQueryWrapper);
        users.forEach(System.out::println);
    }

    @Test
    void test2(){
        QueryWrapper<User> userQueryWrapper = new QueryWrapper<>();
        userQueryWrapper.eq("name", "无名高");
        User user = userMapper.selectOne(userQueryWrapper);
        System.out.println(user);
    }

    @Test
    void test3(){
        QueryWrapper<User> userQueryWrapper = new QueryWrapper<>();
        //查询年龄在20-30岁之间的用户
        userQueryWrapper.between("age", 20,30);
        Integer count = userMapper.selectCount(userQueryWrapper);

        System.out.println(count);
    }

    @Test
    void test4(){
        QueryWrapper<User> userQueryWrapper = new QueryWrapper<>();
        //查询年龄在20-30岁之间的用户
        userQueryWrapper.between("age", 20,30);
        List<Map<String, Object>> maps = userMapper.selectMaps(userQueryWrapper);
        maps.forEach(System.out::println);
//        System.out.println(count);
    }

    //模糊查询
    @Test
    void test6(){
        QueryWrapper<User> userQueryWrapper = new QueryWrapper<>();
        //right表示xx% %通配符在右边
        userQueryWrapper.notLike("name", "e")
                .likeRight("name", "gao");
        List<Map<String, Object>> maps = userMapper.selectMaps(userQueryWrapper);
        maps.forEach(System.out::println);
//        System.out.println(count);
    }

    //in子查询
    @Test
    void test7(){
        QueryWrapper<User> userQueryWrapper = new QueryWrapper<>();
        //
        userQueryWrapper.inSql("id", "select id from user where id < 5");
        List<Object> objects = userMapper.selectObjs(userQueryWrapper);
        objects.forEach(System.out::println);
    }

    //order by
    @Test
    void test8(){
        QueryWrapper<User> userQueryWrapper = new QueryWrapper<>();
        //
        userQueryWrapper.inSql("id", "select id from user where id < 5")
        .orderByDesc("id");
        List<Object> objects = userMapper.selectObjs(userQueryWrapper);
        objects.forEach(System.out::println);
    }


}
10.代码自动生成器
AutoGenerator 是 MyBatis-Plus 的代码生成器,通过 AutoGenerator 可以快速生成 Entity、Mapper、Mapper XML、Service、Controller 等各个模块的代码,极大的提升了开发效率。
package com.learn.mp;

import com.baomidou.mybatisplus.annotation.DbType;
import com.baomidou.mybatisplus.annotation.FieldFill;
import com.baomidou.mybatisplus.annotation.IdType;
import com.baomidou.mybatisplus.annotation.TableField;
import com.baomidou.mybatisplus.generator.AutoGenerator;
import com.baomidou.mybatisplus.generator.InjectionConfig;
import com.baomidou.mybatisplus.generator.config.DataSourceConfig;
import com.baomidou.mybatisplus.generator.config.GlobalConfig;
import com.baomidou.mybatisplus.generator.config.PackageConfig;
import com.baomidou.mybatisplus.generator.config.StrategyConfig;
import com.baomidou.mybatisplus.generator.config.po.TableFill;
import com.baomidou.mybatisplus.generator.config.rules.DateType;
import com.baomidou.mybatisplus.generator.config.rules.NamingStrategy;
import com.baomidou.mybatisplus.generator.engine.FreemarkerTemplateEngine;

import java.util.ArrayList;
import java.util.Arrays;

/**
 * @author wuminggao
 * @create 2020-07-25-下午10:12
 */
//代码自动生成器
public class AutoGene {
    public static void main(String[] args) {
        //构建一个代码生成器对象
        AutoGenerator mpg = new AutoGenerator();


        //配置策略

        //1.全局配置
        GlobalConfig gc = new GlobalConfig();
        //获取当前路径 注意main方法默认获取到是到项目根路径,@Test单元测试以module为根路径
        String property = System.getProperty("user.dir");
        gc.setOutputDir(property+"/001-springboot-mybatisplus/src/main/java");
        gc.setAuthor("wuminggao");
        gc.setOpen(false);
        gc.setFileOverride(false);//是否覆盖
        gc.setServiceName("%sService");//去掉Service的I前缀
        gc.setIdType(IdType.AUTO);
        gc.setDateType(DateType.ONLY_DATE);
        gc.setSwagger2(true);
        mpg.setGlobalConfig(gc);

        //2.设置数据源
        DataSourceConfig dsc = new DataSourceConfig();
        dsc.setDriverName("com.mysql.cj.jdbc.Driver");
        dsc.setPassword("aliyunmysql123");
        dsc.setUrl("jdbc:mysql://120.79.69.241:3306/mp?useUnicode=true&characterEncoding=utf8&serverTimezone=GMT%2B8");
        dsc.setUsername("root");
        dsc.setDbType(DbType.MYSQL);
        mpg.setDataSource(dsc);

        //3.包的配置
        PackageConfig pc = new PackageConfig();
        pc.setModuleName("blog");
        pc.setParent("com.learn");
        pc.setEntity("entity");
        pc.setMapper("mapper");
        pc.setController("controller");
        pc.setService("service");
        pc.setServiceImpl("impl");
        mpg.setPackageInfo(pc);

        //4.策略配置
        StrategyConfig strategy = new StrategyConfig();
        strategy.setInclude("user", "tbl_employee");//设置要映射的表名
        strategy.setNaming(NamingStrategy.underline_to_camel);//下划线转驼峰
        strategy.setColumnNaming(NamingStrategy.underline_to_camel);
        strategy.setEntityLombokModel(true);//自动生成Lombok
//        strategy.setRestControllerStyle(true);//restful风格
        strategy.setLogicDeleteFieldName("deleted");
        //自动填充配置
        TableFill createTime = new TableFill("create_time", FieldFill.INSERT);//字段名gmt_create更好
        TableFill updateTime = new TableFill("update_time", FieldFill.INSERT_UPDATE);//gmt_modified更好
        ArrayList<TableFill> tableFills = new ArrayList<>();
        tableFills.add(createTime);
        tableFills.add(updateTime);
        strategy.setTableFillList(tableFills);
        //乐观锁
        strategy.setVersionFieldName("version");

        strategy.setControllerMappingHyphenStyle(true);//localhost:8080/hello_id_2
        mpg.setStrategy(strategy);


        //执行
        mpg.execute();
    }
}