- 第一章 SpringBoot框架入门
- 第二章 SpringBoot入门案例
- 第三章 SpringBoot框架Web开发
- 第四章 SpringBoot非Web应用程序
- 第五章 SpringBoot使用拦截器
- 第六章 SpringBoot使用Servlet(了解)
- 第七章 SpringBoot使用Filter(了解)
- 第八章 SpringBoot项目配置字符编码
- 第九章 SpringBoot打包与部署
- 第十章 SpringBoot集成logback日志
- 第十一章 SpringBoot集成Thymeleaf模板
- 第十二章 SpringBoot总结及综合案例
SpringBoot学习过程的案例记录
我参考的SpringBoot教程
第一章 SpringBoot框架入门
1.1 SpringBoot简介

1.2 SpringBoot的特性
1.3 SpringBoot 4大核心
第二章 SpringBoot入门案例
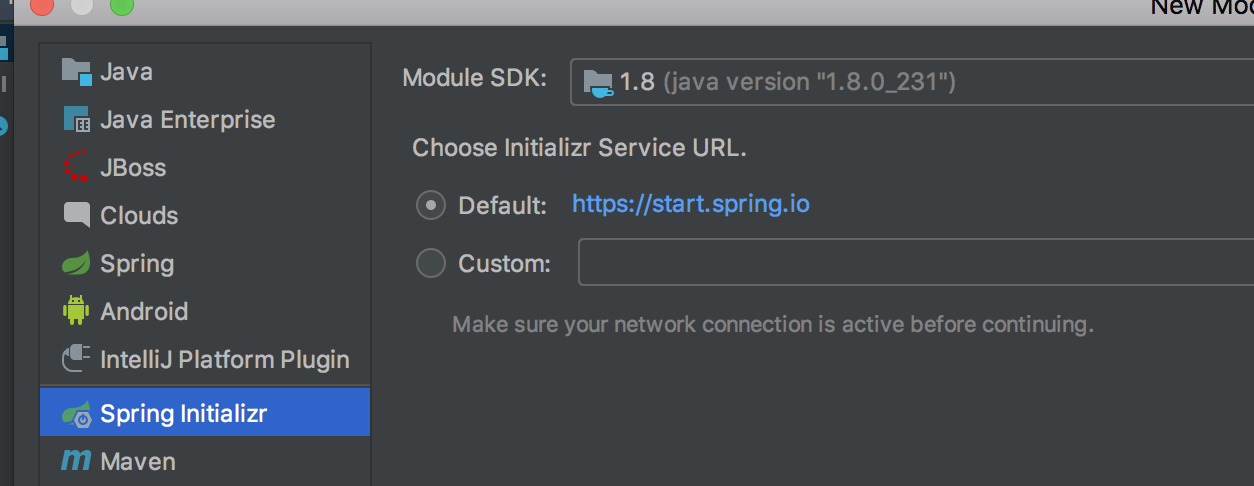
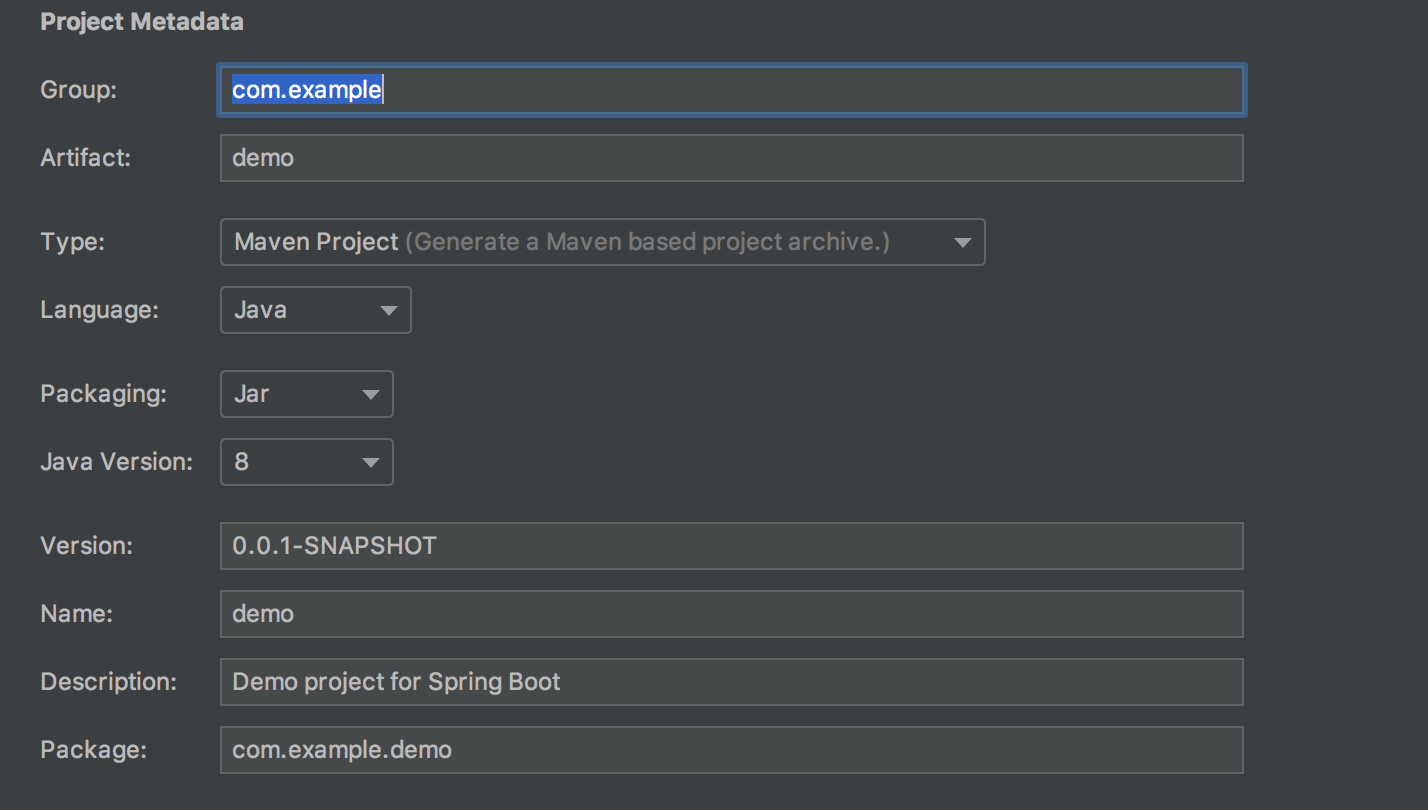
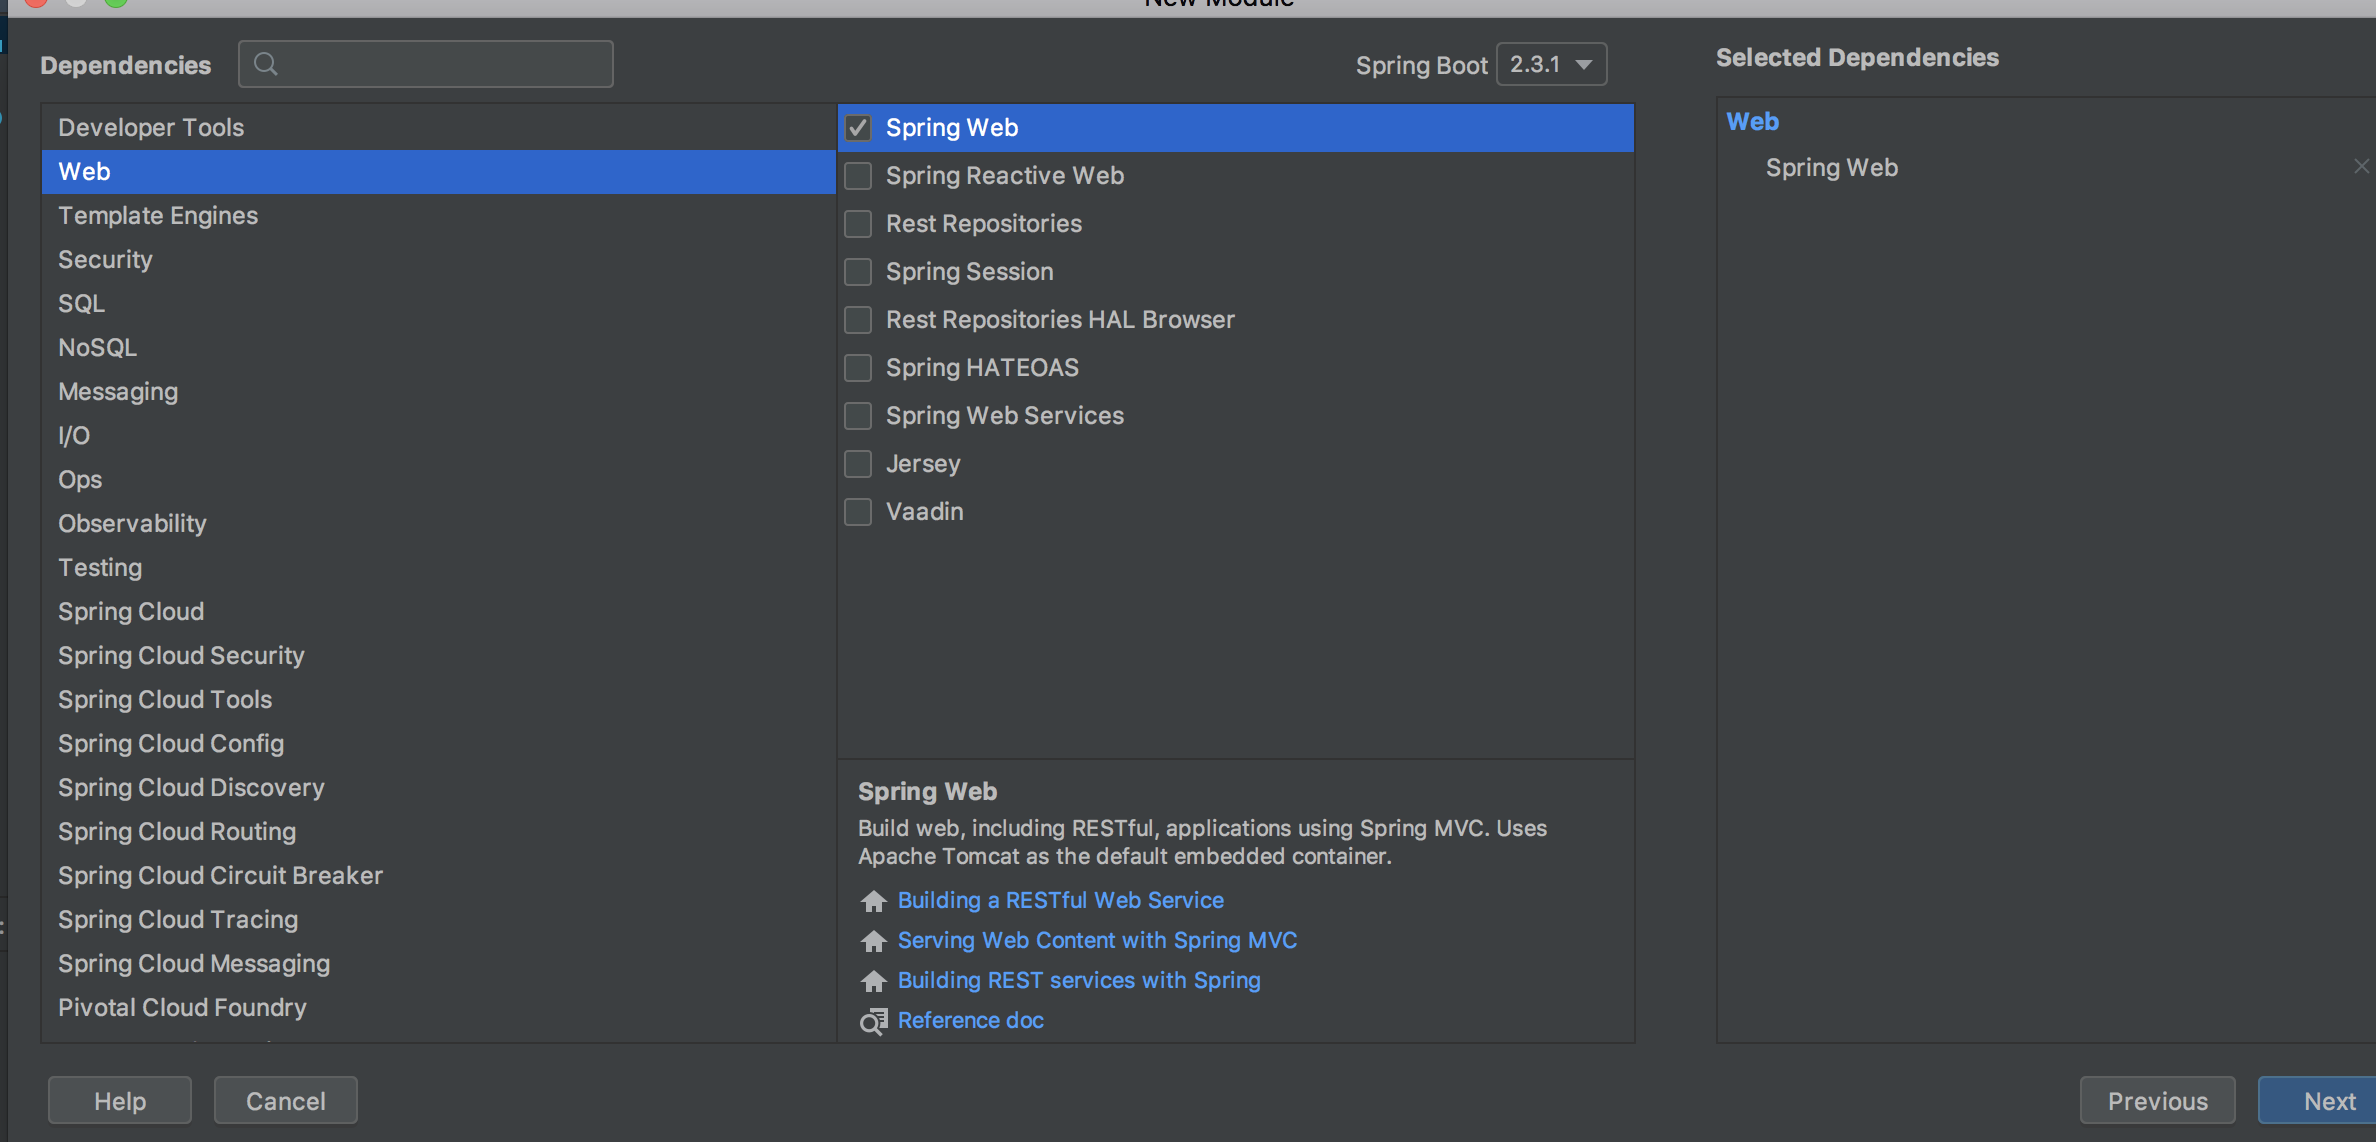
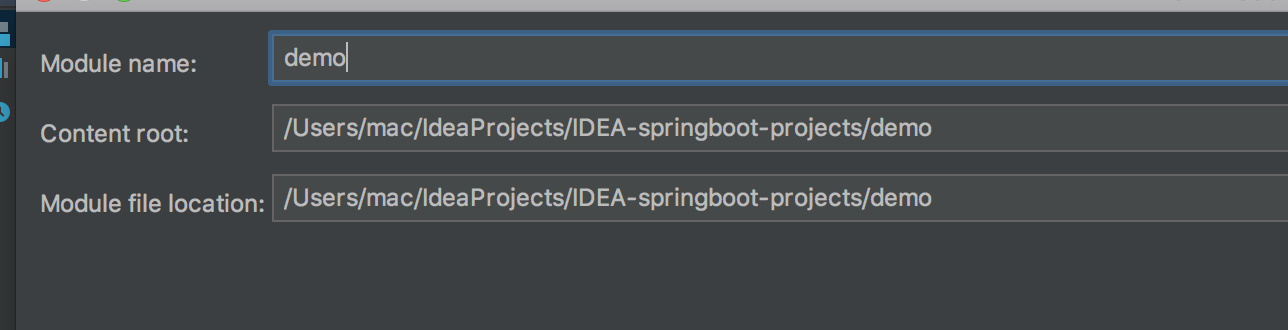
2.1 学会如何创建一个SpringBoot web工程
new一个module,选择Spring Initializr
设置项目名称,版本等
选择Web -> Spring Web
设置模块名字
2.2 运行一个web工程
package com.learn.springboot.web;

import org.springframework.stereotype.Controller;
import org.springframework.web.bind.annotation.RequestMapping;
import org.springframework.web.bind.annotation.ResponseBody;
import org.springframework.web.servlet.ModelAndView;

@Controller
public class IndexController {

    @RequestMapping(value = "/springboot/say")
    @ResponseBody
    public String say(ModelAndView modelAndView){
        System.out.println(modelAndView);
        return "Hello spring Boot";
    }
}
然后直接运行Application的main方法即可
2.3 application.properties配置
#设置内嵌Tomcat端口号
server.port=8099

#设置上下文根
server.servlet.context-path=/springboot
2.4 使用application.yml 或者application.yaml
server:
  port: 10000
  servlet:
    context-path: /yaml
2.5 两种配置文件同时存在的情况
以.properties为准,忽略另一个配置文件
2.6 多环境下的核心配置文件的使用
2.6.1 properties文件
工作中开发的环境:开发环境/测试环境/准生产环境/生产环境等
配置文件以application-开头
eg:
application-dev.properties
application-test.properties
在主配置文件激活配置文件
#主核心配置文件
#激活使用的配置文件
spring.profiles.active=dev
2.6.2 yaml文件
同样配置文件以application-开头
eg:
application-product.yml
在主配置文件激活配置文件
spring:
  profiles:
    active: test
2.7 自定义配置
SpringBoot在核心配置文件application.properties自定义配置
在application.properties中写上
server.port=8080
server.servlet.context-path=/

school.name=wuminggao
websit=https://www.wuminggao.com
使用注解@Value注入属性
@Controller
public class IndexController {

    @Value("${school.name}")
    private String schoolName;

    @RequestMapping("/say")
    @ResponseBody
    public String say(){
        return "Hello SpringBoot multi-environment";
    }
}
2.8 将自定义配置映射到对象
SpringBoot在核心配置文件将自定义配置映射成一个对象
使用@ConfigurationProperties(prefix = "xx")填写前缀
application.properties
server.port=8080
server.servlet.context-path=/

school.name=wuminggao
school.website=https://www.wuminggao.com
创建一个配置类
@Component //将此类交给spring容器进行管理
@ConfigurationProperties(prefix = "school")
public class School {
    private String name;
    private String website;

    public String getName() {
        return name;
    }

    public void setName(String name) {
        this.name = name;
    }

    public String getWebsite() {
        return website;
    }

    public void setWebsite(String website) {
        this.website = website;
    }
}
将其注入School类的实例
@Controller
public class IndexController {

    @Autowired
    private School school;

    @RequestMapping("/say")
    @ResponseBody
    public String say(){
        System.out.println("schoolName:" + school.getName() + ",website");
        return "Hello SpringBoot  " + ",school.name:" + school.getName() +
                ",school.website:" + school.getWebsite();
    }
}
2.9 SpringBoot集成jsp
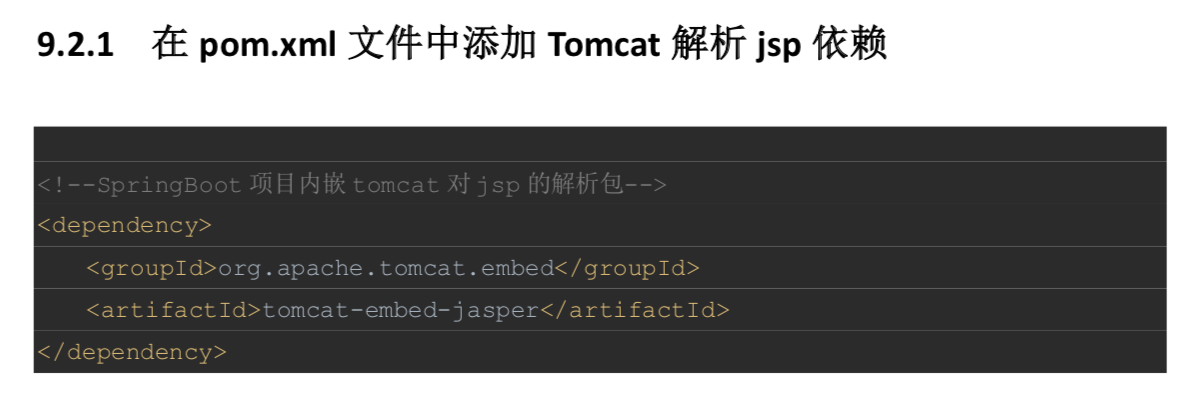
首先在pom.xml添加jsp依赖
<!--		引入SpringBoot内嵌Tomcat对jsp的解析包
			不添加解析不了jsp
			仅仅只是展示jsp页面,只添加以下一个依赖
-->
		<dependency>
			<groupId>org.apache.tomcat.embed</groupId>
			<artifactId>tomcat-embed-jasper</artifactId>
		</dependency>
在pom.xml指定jsp编译路径
<build>

<!--		SpringBoot项目默认推荐使用的前端引擎是thymeleaf
			我们要使用SpringBoot集成jsp,手动指定jsp最后编译的路径
			而且SpringBoot集成jsp编译jsp的路径是SpringBoot规定好的位置
			META-INF/resources

-->
		<resources>
			<resource>
<!--				源文件夹-->
				<directory>src/main/webapp</directory>
<!--				指定编译到目标文件夹-->
				<targetPath>META-INF/resources</targetPath>
<!--				指定源文件夹中的哪个文件需要进行编译-->
				<includes>
					<include>*.*</include>
				</includes>
			</resource>
		</resources>
</build>
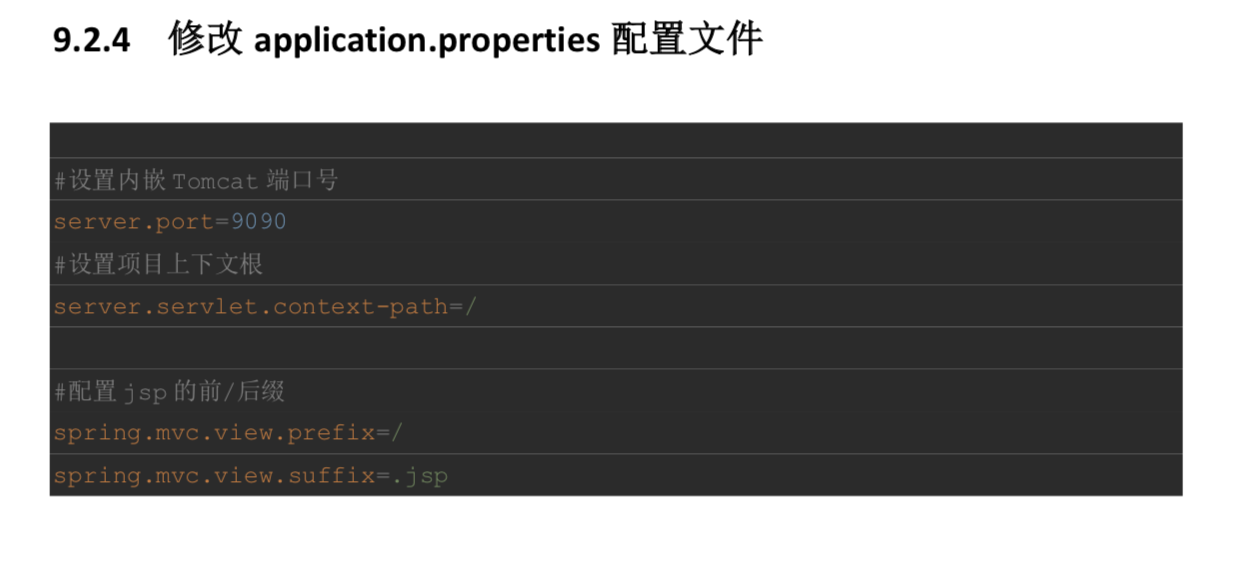
在application.properties配置视图解析器
#配置视图解析器
spring.mvc.view.prefix=/
spring.mvc.view.suffix=.jsp
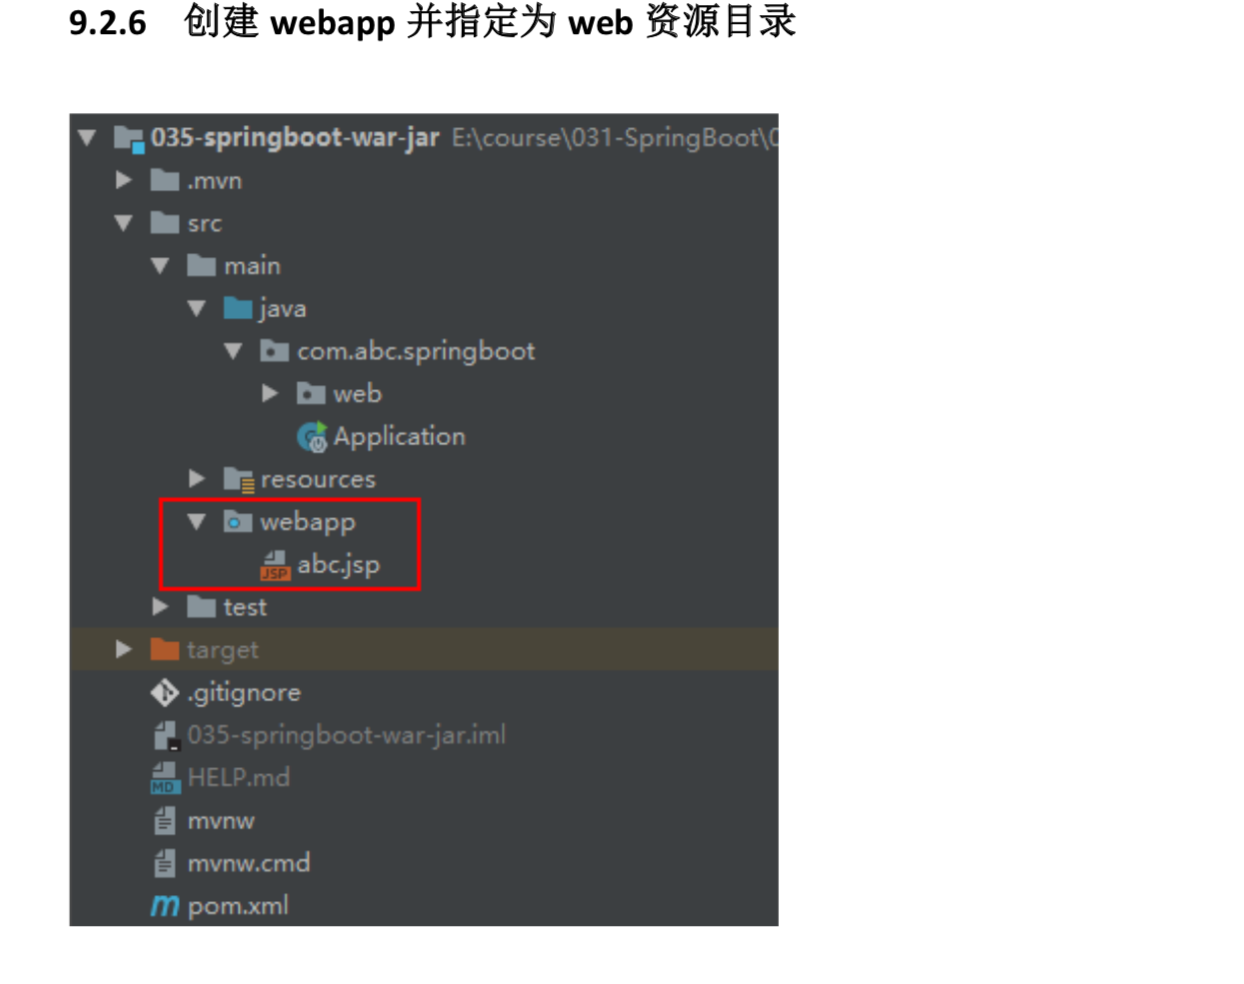
在src/main/下创建webapp目录,并设置为Web Resource的路径
在webapp下创建say.jsp
<%@ page contentType="text/html;charset=UTF-8" language="java" %>
<html>
<head>
    <title>say</title>
</head>
<body>
say:${msg}
</body>
</html>
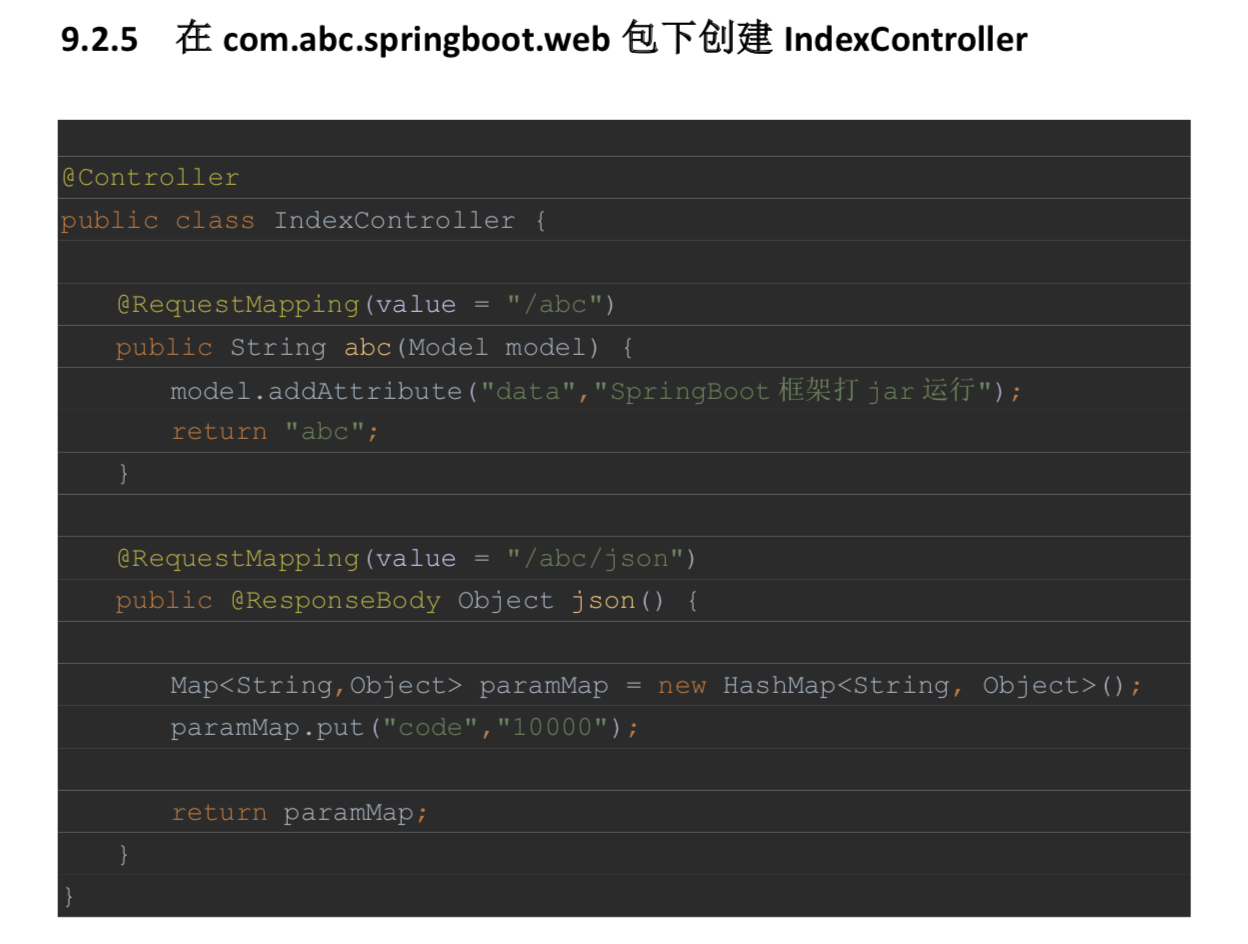
在Controller中转发请求到jsp
@Controller
public class IndexController {

    @RequestMapping("/say")
    public ModelAndView say(ModelAndView modelAndView){
        modelAndView.addObject("msg", "Hello, SpringBoot");
        modelAndView.setViewName("say");
        return modelAndView;
    }
}
第三章 SpringBoot框架Web开发
3.1 集成MyBatis
1)添加mybatis依赖,mysql驱动
<!--		MySql驱动-->
		<dependency>
			<groupId>mysql</groupId>
			<artifactId>mysql-connector-java</artifactId>
		</dependency>

<!--		MyBatis整合SpringBoot框架的起步依赖-->
		<dependency>
			<groupId>org.mybatis.spring.boot</groupId>
			<artifactId>mybatis-spring-boot-starter</artifactId>
			<version>2.0.0</version>
		</dependency>
2)MyBatis逆向工程生成实体bean,映射文件,DAO接口
在module根目录下,创建一个xml文件:GeneratorMapper.xml
<?xml version="1.0" encoding="UTF-8"?>
<!DOCTYPE generatorConfiguration
        PUBLIC "-//mybatis.org//DTD MyBatis Generator Configuration 1.0//EN"
        "http://mybatis.org/dtd/mybatis-generator-config_1_0.dtd">
<generatorConfiguration>
    <!-- 指定连接数据库的 JDBC 驱动包所在位置,指定到你本机的完整路径 -->
    <classPathEntry location="E:\mysql-connector-java-5.1.38.jar"/>

    <!-- 配置 table 表信息内容体,targetRuntime 指定采用 MyBatis3 的版本 -->
    <context id="tables" targetRuntime="MyBatis3">
        <!-- 抑制生成注释,由于生成的注释都是英文的,可以不让它生成 -->
        <commentGenerator>
            <property name="suppressAllComments" value="true" />
        </commentGenerator>
        <!-- 配置数据库连接信息 -->
        <jdbcConnection driverClass="com.mysql.jdbc.Driver"
                        connectionURL="jdbc:mysql://localhost:3306/springboot"
                        userId="root"
                        password="123456">
        </jdbcConnection>
        <!-- 生成 model 类,targetPackage
        指定 model 类的包名, targetProject
        指定 生成的 model 放在 eclipse 的哪个工程下面-->
        <javaModelGenerator targetPackage="com.abc.springboot.model" targetProject="src/main/java">
            <property name="enableSubPackages" value="false" />
            <property name="trimStrings" value="false" />
        </javaModelGenerator>
        <!-- 生成 MyBatis 的 Mapper.xml 文件,targetPackage
        指定 mapper.xml 文件的 包名, targetProject
        指定生成的 mapper.xml 放在 eclipse 的哪个工程下面 -->
        <sqlMapGenerator targetPackage="com.abc.springboot.mapper"
                         targetProject="src/main/java">
            <property name="enableSubPackages" value="false" />
        </sqlMapGenerator>
        <!-- 生成 MyBatis 的 Mapper 接口类文件,targetPackage 指定 Mapper 接口类的包 名, targetProject 指定生成的 Mapper 接口放在 eclipse 的哪个工程下面 -->
        <javaClientGenerator type="XMLMAPPER" targetPackage="com.abc.springboot.mapper" targetProject="src/main/java">
            <property name="enableSubPackages" value="false" />
        </javaClientGenerator>
        <!-- 数据库表名及对应的 Java 模型类名 -->
        <table tableName="t_student" domainObjectName="Student"
               enableCountByExample="false" enableUpdateByExample="false" enableDeleteByExample="false"
               enableSelectByExample="false" selectByExampleQueryId="false"/>
    </context>
</generatorConfiguration>
在pom.xml文件中添加mysql逆向工程依赖的插件
<!--mybatis 代码自动生成插件-->
<plugin>
	<groupId>org.mybatis.generator</groupId>
	<artifactId>mybatis-generator-maven-plugin</artifactId>
	<version>1.3.6</version>
	<configuration>
	<!--配置文件的位置-->
		<configurationFile>GeneratorMapper.xml</configurationFile>
		<verbose>true</verbose>
		<overwrite>true</overwrite>
	</configuration>
</plugin>
然后使用generator工具
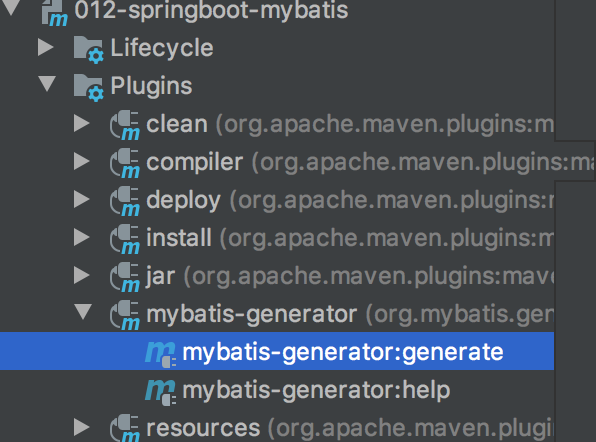
直接生成StudentMapper接口和xml配置文件,以及Student实体类
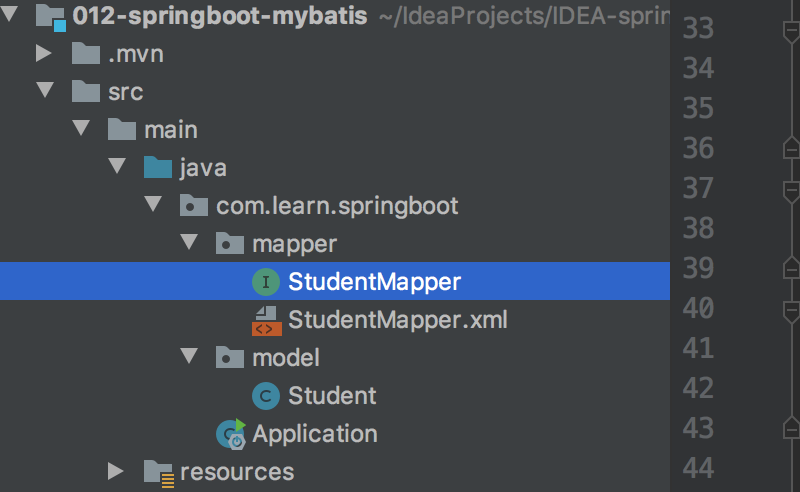
DAO接口
public interface StudentMapper {
    int deleteByPrimaryKey(Integer id);

    int insert(Student record);

    int insertSelective(Student record);

    Student selectByPrimaryKey(Integer id);

    int updateByPrimaryKeySelective(Student record);

    int updateByPrimaryKey(Student record);
}
对应的MyBatis mapper配置文件
<?xml version="1.0" encoding="UTF-8"?>
<!DOCTYPE mapper PUBLIC "-//mybatis.org//DTD Mapper 3.0//EN" "http://mybatis.org/dtd/mybatis-3-mapper.dtd">
<mapper namespace="com.learn.springboot.mapper.StudentMapper">

  <resultMap id="BaseResultMap" type="com.learn.springboot.model.Student">
<!--
      id标签:只能修饰主键字段
      column标签:数据库中的字段名称
      property:映射对象的属性名称
      result:主键以外的字段
-->
    <id column="id" jdbcType="INTEGER" property="id" />
    <result column="name" jdbcType="VARCHAR" property="name" />
    <result column="age" jdbcType="INTEGER" property="age" />
  </resultMap>

<!--    sql语句片段,将公共的部分抽取出来-->
  <sql id="Base_Column_List">
    id, name, age
  </sql>

  <select id="selectByPrimaryKey" parameterType="java.lang.Integer" resultMap="BaseResultMap">
    select
    <include refid="Base_Column_List" />
    from t_student
    where id = #{id,jdbcType=INTEGER}
  </select>

  <delete id="deleteByPrimaryKey" parameterType="java.lang.Integer">
    delete from t_student
    where id = #{id,jdbcType=INTEGER}
  </delete>

  <insert id="insert" parameterType="com.learn.springboot.model.Student">
    insert into t_student (id, name, age
      )
    values (#{id,jdbcType=INTEGER}, #{name,jdbcType=VARCHAR}, #{age,jdbcType=INTEGER}
      )
  </insert>

  <insert id="insertSelective" parameterType="com.learn.springboot.model.Student">
    insert into t_student
--     拼串,要插入的字段
    <trim prefix="(" suffix=")" suffixOverrides=",">
      <if test="id != null">
        id,
      </if>
      <if test="name != null">
        name,
      </if>
      <if test="age != null">
        age,
      </if>
    </trim>

    <trim prefix="values (" suffix=")" suffixOverrides=",">
      <if test="id != null">
        #{id,jdbcType=INTEGER},
      </if>
      <if test="name != null">
        #{name,jdbcType=VARCHAR},
      </if>
      <if test="age != null">
        #{age,jdbcType=INTEGER},
      </if>
    </trim>
  </insert>


  <update id="updateByPrimaryKeySelective" parameterType="com.learn.springboot.model.Student">
    update t_student
    <set>
      <if test="name != null">
        name = #{name,jdbcType=VARCHAR},
      </if>
      <if test="age != null">
        age = #{age,jdbcType=INTEGER},
      </if>
    </set>
    where id = #{id,jdbcType=INTEGER}
  </update>


  <update id="updateByPrimaryKey" parameterType="com.learn.springboot.model.Student">
    update t_student
    set name = #{name,jdbcType=VARCHAR},
      age = #{age,jdbcType=INTEGER}
    where id = #{id,jdbcType=INTEGER}
  </update>


</mapper>
实体bean
public class Student {
    private Integer id;

    private String name;

    private Integer age;

    public Integer getId() {
        return id;
    }

    public void setId(Integer id) {
        this.id = id;
    }

    public String getName() {
        return name;
    }

    public void setName(String name) {
        this.name = name;
    }

    public Integer getAge() {
        return age;
    }

    public void setAge(Integer age) {
        this.age = age;
    }
}
注意:
对数据库中的表字段进行命名的时候,如果字段是多个单词组成,使用下划线隔开。如user_name,user_age
逆向工程自动生成实体bean时,使用下划线作为单词分割符,然后使用驼峰命名法生成bean的属性: 数据库字段user_name -> 类的属性userName
如果数据库字段不用下划线分隔,逆向工程将其视为一个单词: 数据库字段userName -> 类的属性username
3)编写Service层接口和实现类
在Application入口添加注解扫描Mapper包
使用@MapperScan(basePackages = "com.learn.springboot.mapper")//开启扫描mapper接口的包和子包
也可以在需要的Mapper类上添加@Mapper注解,表示扫描这个类
在pom.xml配置资源文件夹,扫描mapper包中的配置文件
<resources>
			<resource>
				<directory>src/main/java</directory>
				<includes>
					<include>**/*.xml</include>
					<include>**/*.properties</include>
				</includes>
			</resource>
		</resources>
扫描Mapper配置文件的另一种方式:
在resources下添加mapper目录,把Mapper配置文件放到该目录下
在主配置文件添加
mybatis.mapper-locations=classpath:mapper/**.xml
4)在主配置文件配置连接数据库的信息等
注意Mysql8.0以上驱动名字为com.mysql.cj.jdbc.Driver
server.port=8080
server.servlet.context-path=/

spring.datasource.url=jdbc:mysql://localhost:3306/springboot?useUnicode=true&characterEncoding=UTF-8&useJDBCCompliantTimezoneShift=true&useLegacyDatetimeCode=false&serverTimezone=UTC
spring.datasource.username=root
spring.datasource.password=xxxxxx
spring.datasource.driver-class-name=com.mysql.cj.jdbc.Driver
3.2 SpringBoot事务
在SpringBoot项目下使用事务
在service实现类或者方法上使用@Transactional注解,开启事务
3.3 SpringMVC其他常用注解
3.3.1 @RestController注解
一种Controller的注解,表示@Controlle+方法上加@ResponseBody
表示该控制器所有方法都返回json对象
3.3.2 @GetMapping
只支持get请求
相当于@RequestMapping(value = "/xxx", method = RequestMethod.GET)
如果使用Post请求会报405错误
一般用于查询操作
3.3.3 @PostMapping
只支持post请求
相当于@RequestMapping(value = "/xxx", method = RequestMethod.POST)
一般用于新增操作
3.3.4 @PutMapping
只支持put请求
一般用于修改操作,更新操作
3.3.5 @DeleteMapping
只支持delete请求
一般用于删除操作
3.4 RESTful
3.4.1 认识RESTful
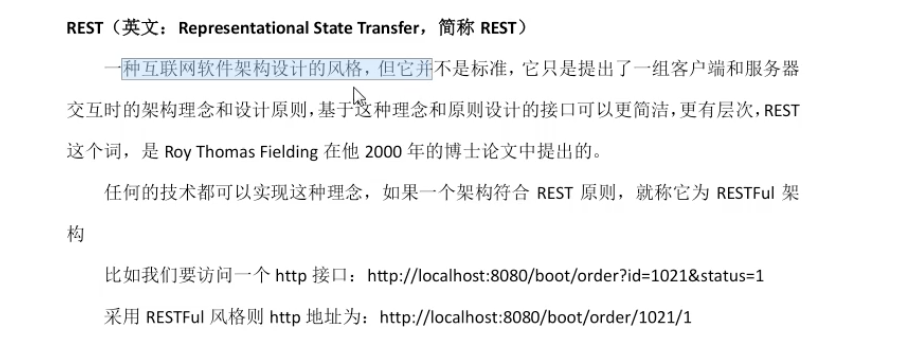
3.4.2 使用RESTful风格接收请求参数
@RequestMapping("/student/detail/{id}/{age}")
    public Student student2(@PathVariable("id") Integer id, @PathVariable("age") Integer age){
        Student student = new Student();
        student.setId(id);
        student.setAge(age);
        return student;

    }
使用{参数名}和@PathVariable("参数名")来接收和获取参数
出现错误:
@RequestMapping("/student/detail/{id}/{age}")
    public Student student2(@PathVariable("id") Integer id, @PathVariable("age") Integer age){
        Student student = new Student();
        student.setId(id);
        student.setAge(age);
        return student;

    }

    @RequestMapping("/student/detail/{id}/{state}")
    public Object student3(@PathVariable("id") Integer id, @PathVariable("state") Integer state){
        HashMap<String, Object> hashMap = new HashMap<>();
        hashMap.put("id", id) ;
        hashMap.put("state", state);
        return hashMap;

    }
这个代码会出现请求路径无法判断的IllegalStateException错误,错误码status=500
我们可以用不同的请求方式区分:Get请求,Post请求,delte请求,put请求等
eg:
@GetMapping("/student/detail/{id}/{age}")
    public Student student2(@PathVariable("id") Integer id, @PathVariable("age") Integer age){
        Student student = new Student();
        student.setId(id);
        student.setAge(age);
        return student;

    }

    @DeleteMapping("/student/detail/{id}/{state}")
    public Object student3(@PathVariable("id") Integer id, @PathVariable("state") Integer state){
        HashMap<String, Object> hashMap = new HashMap<>();
        hashMap.put("id", id) ;
        hashMap.put("state", state);
        return hashMap;
    }
注意
RESTful请求参数尽量不要使用动词,使用名词
分页,排序等操作,不需要使用斜杠传参数
3.5 SpringBoot集成Redis
添加依赖:添加操作redis数据类型的依赖
<!--		Springboot集成Redis依赖-->
		<dependency>
			<groupId>org.springframework.boot</groupId>
			<artifactId>spring-boot-starter-data-redis</artifactId>
		</dependency>
配置连接redis的信息
spring.redis.host=xxx
spring.redis.port=6379
spring.redis.password=1234
业务层:
@Service
public class StudentServiceImpl implements StudentService {
    //Spring-data-redis提供的操作redis的模板对象
    @Autowired
    private RedisTemplate<Object, Object> redisTemplate;

    @Override
    public void put(String key, String value) {
        redisTemplate.opsForValue().set(key, value);
    }

    @Override
    public String get(String key) {
        String o = (String)redisTemplate.opsForValue().get(key);
        return o;
    }
}
控制层:
@RestController
public class StudentController {

    @Autowired
    private StudentService studentService;

    @PutMapping("/put")
    public Object put(String key, String value){

        studentService.put(key, value);

        return "值已经放入redis";
    }

    @GetMapping("/get")
    public Object get(String key){

        String s = studentService.get(key);

        return s;
    }
}
3.6 SpringBoot集成Dubbo
接口工程:提供业务接口和实体bean
服务提供者:业务接口的实现类,调用数据持久层,将服务暴露到注册中心
-添加依赖(dubbo,注册中心,接口工程)
-配置服务提供者核心配置文件
服务消费者:处理浏览器客户端发送的请求,从注册中心调用服务提供者所提供的服务
-添加依赖(dubbo,注册中心,接口工程)
-配置服务消费者核心配置文件
参考我的SpringBoot案例
里面的020 021 022
使用到的新注解
1)@EnableDubboConfiguration//开启dubbo配置
在SpringBoot入口处使用
2)@Service(interfaceClass = StudentService.class, version = "1.0.0", timeout = 15000)
注意是com.alibaba.dubbo.config.annotation.Service;
用于提供者暴露接口,添加在实现类上面
3)@Reference(interfaceClass = StudentService.class, version = "1.0.0", check = true)
注意是com.alibaba.dubbo.config.annotation.Reference;
控制层用于注入实现类,添加在属性上面
配置消费者
#设置内嵌TOmcat端口号
server.port=8082

server.servlet.context-path=/

#设置dubbo的配置
spring.application.name=022-springboot-dubbo-consumer

#设置注册中心
spring.dubbo.registry=zookeeper://localhost:2181
配置提供者
#设置内嵌TOmcat端口号
server.port=8081

server.servlet.context-path=/

#设置dubbo的配置
spring.application.name=021-springboot-dubbo-provider
#当前工程是一个服务提供者
spring.dubbo.server=true

#设置注册中心
spring.dubbo.registry=zookeeper://localhost:2181
3.7 SpirngBoot集成Dubbo和SSM
接口工程:存放实体Bean和业务接口
服务提供者:它是一个SpringBoot Web项目,集成MyBatis,Redis
-依赖:MyBatis,Redis,Dubbo,zookeeper,MySQL,接口工程
-配置:SpringBoot核心配置文件
----配置连接数据库
----配置连接Redis
----配置Dubbo
----配置Tomcat
服务消费者:它是一个SpringBoot Web项目,集成Jsp,Dubbo
-依赖:Dubbo,zookeeper,Jsp,接口工程
-配置:SpringBoot核心配置文件
----视图解析器
----配置Dubbo
----配置Tomcat
第四章 SpringBoot非Web应用程序
4.1 创建一个SpringBoot非web工程
在创建时,单击Web后,不点击Spring Web选项
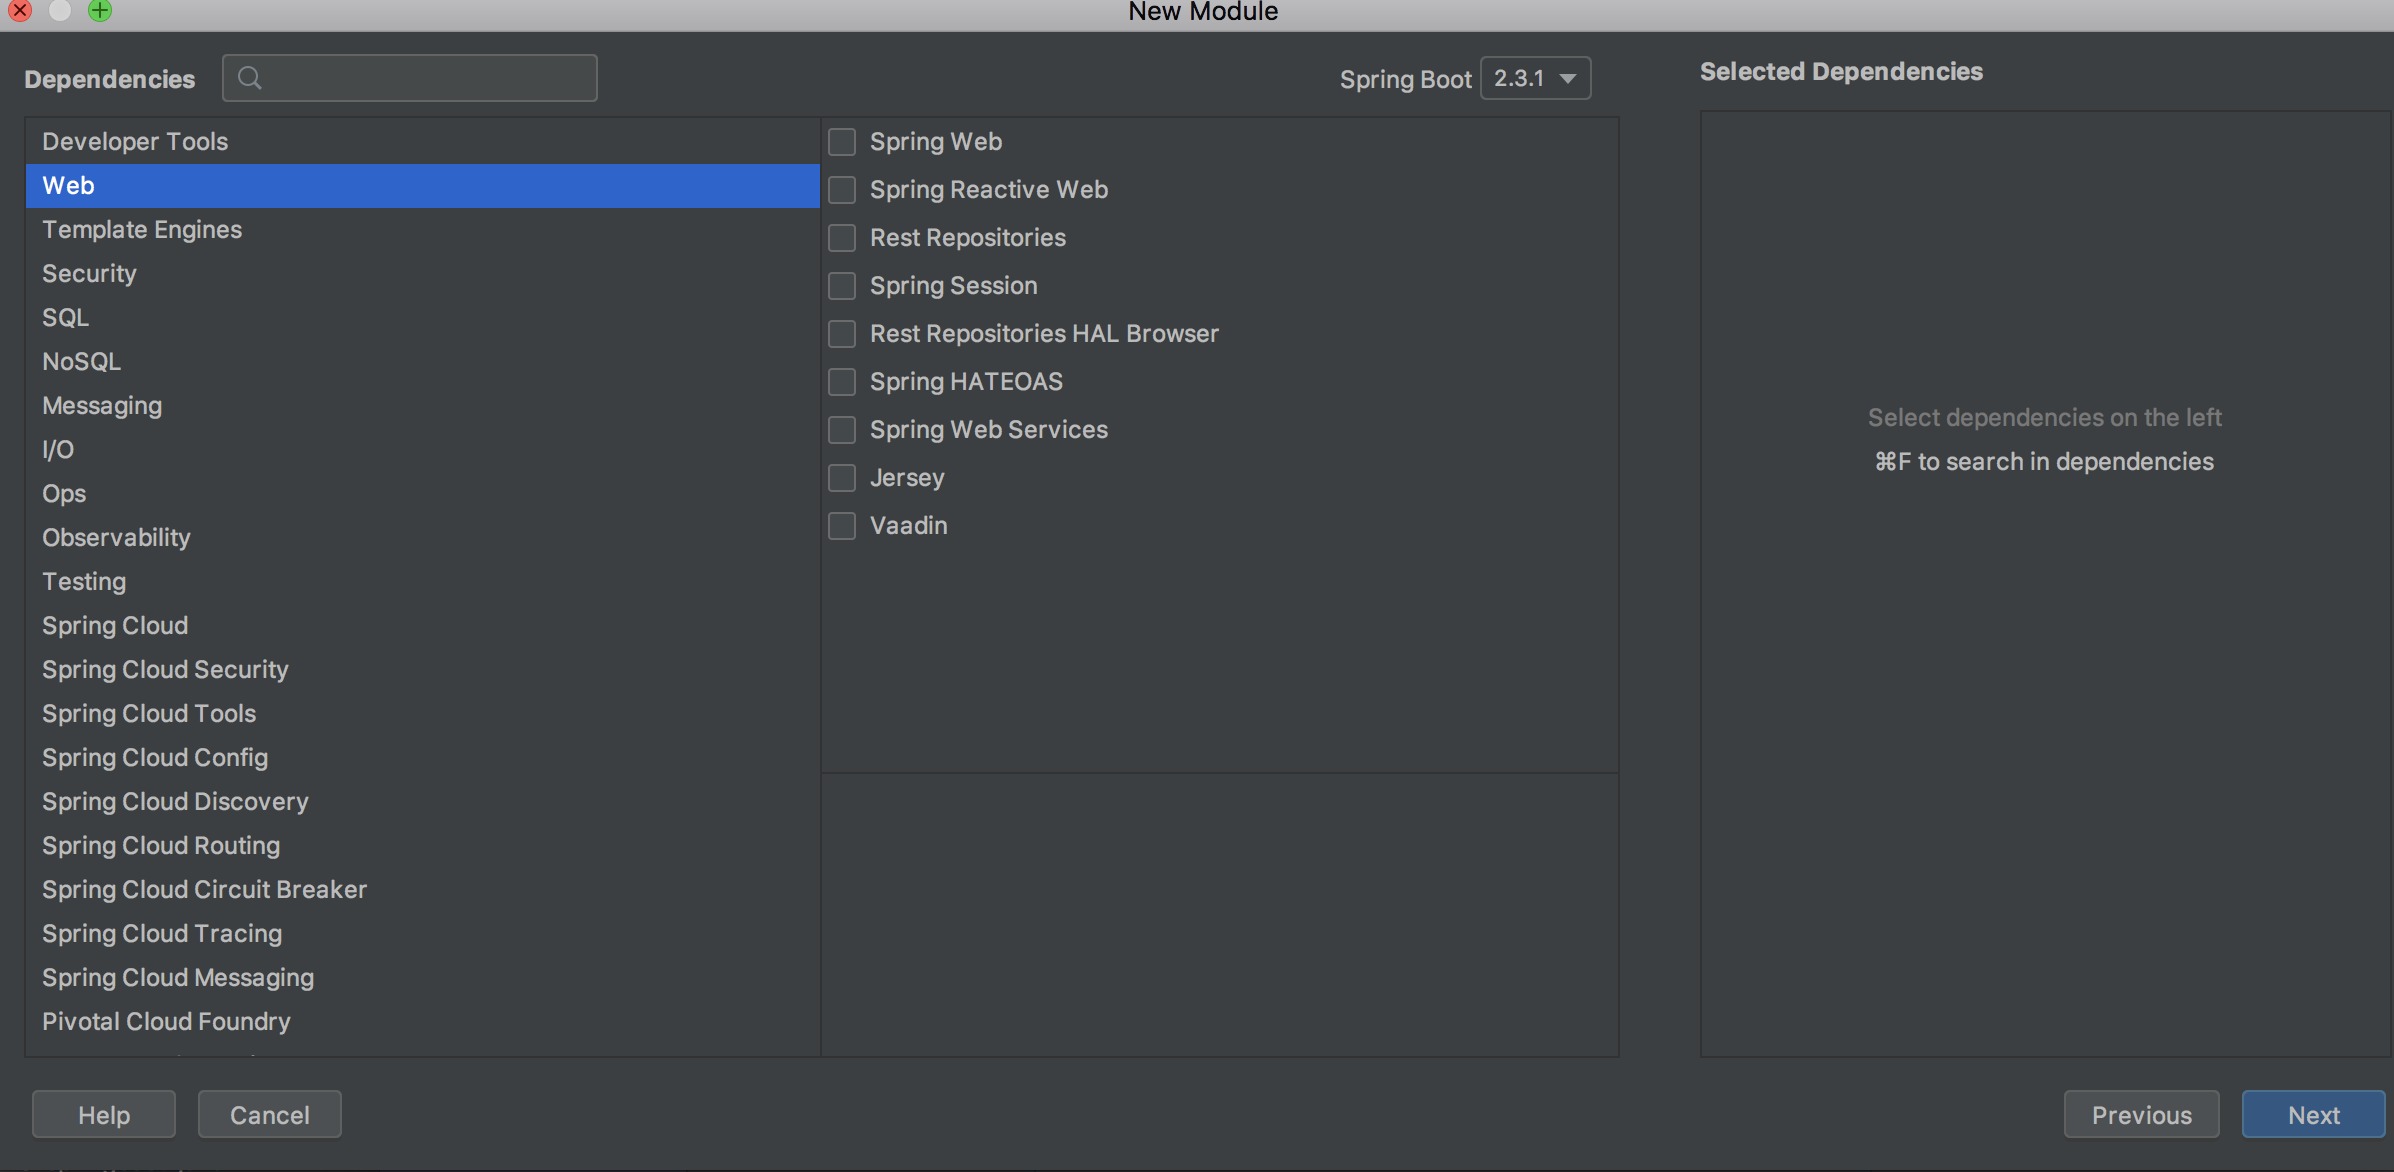
直接单击next
4.2 获取SpringBoot容器中的bean对象
方式一:
@SpringBootApplication
public class Application {

	public static void main(String[] args) {
		/**
		 * SpringBoot程序启动后,返回值是ConfigurableApplicationContext,它也是一个Spring容器
		 * 相当于原来Spring容器中启动ClasspathXmlApplicationContext;
		 */

		ConfigurableApplicationContext run = SpringApplication.run(Application.class, args);
		StudentService studentServiceImpl = run.getBean("studentServiceImpl", StudentService.class);
		String s = studentServiceImpl.sayHello();
		System.out.println(s);


	}

}
方式二:
@SpringBootApplication
public class Application implements CommandLineRunner {

	@Autowired
	private StudentService studentService;

	public static void main(String[] args) {

		SpringApplication.run(Application.class, args);
	}

	//重写CommandLineRunner的run方法
	@Override
	public void run(String... args) throws Exception {
		String s = studentService.sayHello(" World");
		System.out.println(s);
	}
}
4.3 关闭SpringBoot启动图标
@SpringBootApplication
public class Application {

	public static void main(String[] args) {

//		SpringApplication.run(Application.class, args);
		SpringApplication springApplication = new SpringApplication(Application.class);
		//关闭启动logo
		springApplication.setBannerMode(Banner.Mode.OFF);
		springApplication.run(args);

	}

}
4.4 自定义启动logo
利用网站生成logo, 网站:https://www.bootschool.net/ascii 或 者 http://patorjk.com/software/taag/
在resource下新建banner.txt
将生成内容copy进去即可
第五章 SpringBoot使用拦截器
步骤
1)定义一个拦截器,实现HandlerInterceptor接口
public class UserInterceptor implements HandlerInterceptor {

    @Override
    public boolean preHandle(HttpServletRequest request, HttpServletResponse response, Object handler) throws Exception {

        System.out.println("进入拦截器");
        //编写业务拦截的规则
        //从session获取用户的信息
        User user = (User)request.getSession().getAttribute("user");

        if (null == user){
            response.sendRedirect(request.getContextPath() + "/user/error");
            return false;
        }

        return true;
    }

    @Override
    public void postHandle(HttpServletRequest request, HttpServletResponse response, Object handler, ModelAndView modelAndView) throws Exception {

    }

    @Override
    public void afterCompletion(HttpServletRequest request, HttpServletResponse response, Object handler, Exception ex) throws Exception {

    }
}
2)创建一个配置类(即:在SpringMVC配置文件中使用mvc:interceptor标签)
@Configuration//定义此类为配置类
public class InterceptorConfig implements WebMvcConfigurer {
    @Override
    public void addInterceptors(InterceptorRegistry registry) {
        registry.addInterceptor(
                new UserInterceptor())
                .addPathPatterns("/user/**")//拦截user下的所有访问请求
                .excludePathPatterns(Arrays.asList("/user/out", "/user/error", "/user/login"));//排除掉的路径,不登录也可以访问


    }
}
3)编写控制层方法
@Controller
@RequestMapping("/user")
public class UserController {

    /**
     * 用户登录请求
     * @param request
     * @return
     */
    @RequestMapping("/login")
    @ResponseBody
    public String login(HttpServletRequest request){
        User user = new User();
        user.setId(1);
        user.setUserName("zhangsan");
        request.getSession().setAttribute("user", user);

        return "login success";

    }

    /**
     * 登录后才可以访问
     * @return
     */
    @RequestMapping("/center")
    @ResponseBody
    public String center(){

        return "see center message";
    }

    /**
     * 不登录也可以访问的请求
     * @return
     */
    @RequestMapping("/out")
    @ResponseBody
    public String out(){

        return "see out message";
    }

    /**
     * 如果用户没登录访问了需要登录的页面,跳转到该请求
     * @return
     */
    @RequestMapping("/error")
    @ResponseBody
    public String error(){

        return "error! you need login";
    }
}
第六章 SpringBoot使用Servlet(了解)
方式一:使用注解
-编写Servlet类,继承HttpServlet,按需要重写DoGet和DoPost方法
-在该类加上注解@WebServlet(urlPatterns = "/xxx")
-然后在入口类添加@ServletComponentScan(basePackages = "com.xxx.xxx")扫描Servlet所在包
@SpringBootApplication
@ServletComponentScan(basePackages = "com.learn.springboot.servlet")
public class Application {

	public static void main(String[] args) {
		SpringApplication.run(Application.class, args);
	}

}


@WebServlet(urlPatterns = "/myservlet")
public class MyServlet extends HttpServlet {
    @Override
    protected void doGet(HttpServletRequest req, HttpServletResponse resp) throws ServletException, IOException {
        resp.getWriter().write("***** MyServlet method *****");
        resp.getWriter().flush();
        resp.getWriter().close();
    }

    @Override
    protected void doPost(HttpServletRequest req, HttpServletResponse resp) throws ServletException, IOException {
        doGet(req, resp);
    }
}
方式二:通过配置类注册组件
-编写servlet
public class MyServlet extends HttpServlet {
    @Override
    protected void doGet(HttpServletRequest req, HttpServletResponse resp) throws ServletException, IOException {
        resp.getWriter().write("***** MyServlet2 method *****");
        resp.getWriter().flush();
        resp.getWriter().close();
    }

    @Override
    protected void doPost(HttpServletRequest req, HttpServletResponse resp) throws ServletException, IOException {
        doGet(req, resp);
    }
}
-编写配置类,将servlet交给spring容器
@Configuration
public class ServletConfig {

    @Bean
    public ServletRegistrationBean<MyServlet> myServletRegistrationBean(){
        ServletRegistrationBean<MyServlet> myServletServletRegistrationBean
                = new ServletRegistrationBean<>(new MyServlet(), "/myservlet");

        return myServletServletRegistrationBean;
    }
}
第七章 SpringBoot使用Filter(了解)
方式一:
入口类:
@SpringBootApplication
@ServletComponentScan(basePackages = "com.learn.springboot.filter")
public class Application {

	public static void main(String[] args) {
		SpringApplication.run(Application.class, args);
	}

}

过滤器:
@WebFilter(urlPatterns = "/myfilter")
public class MyFilter implements Filter {


    @Override
    public void doFilter(ServletRequest servletRequest, ServletResponse servletResponse, FilterChain filterChain) throws IOException, ServletException {
        System.out.println("this a filter");
        filterChain.doFilter(servletRequest, servletResponse);
    }


}
方式二:
通过配置类注册组件
public class MyFilter implements Filter {
    @Override
    public void doFilter(ServletRequest servletRequest, ServletResponse servletResponse, FilterChain filterChain) throws IOException, ServletException {
        System.out.println("********filter2********");
        filterChain.doFilter(servletRequest, servletResponse);
    }
}


@Configuration
public class FilterConfig {

    @Bean
    public FilterRegistrationBean myFilterRegistrationBean(){
        FilterRegistrationBean<Filter> filterFilterRegistrationBean
                = new FilterRegistrationBean<>(new MyFilter());
        filterFilterRegistrationBean.addUrlPatterns("/user/*");

        return filterFilterRegistrationBean;
    }
}

@Controller
public class UserController {

    @RequestMapping("/user/detail")
    @ResponseBody
    public String userDetail(){
        return "this is user detail: ";
    }

    @RequestMapping("/other")
    @ResponseBody
    public String doOther(){
        return "this is other method ";
    }

}
注意拦截器的urlpatter要写一个*通配符
第八章 SpringBoot项目配置字符编码
方式一:
-编写Servlet返回中文
@WebServlet(urlPatterns = "/myservlet")
public class MyServlet extends HttpServlet {
    @Override
    protected void doGet(HttpServletRequest req, HttpServletResponse resp) throws ServletException, IOException {
        resp.setContentType("text/html;charset=utf-8");

        PrintWriter writer = resp.getWriter();

        writer.write("你好 hello world!");
        writer.flush();
        writer.close();
    }

    @Override
    protected void doPost(HttpServletRequest req, HttpServletResponse resp) throws ServletException, IOException {
        doGet(req, resp);
    }
}
-编写配置类,配置filter
@Configuration
public class SystemConfig {

    @Bean
    public FilterRegistrationBean getCharacterEncodingFilter(){
        CharacterEncodingFilter characterEncodingFilter
                = new CharacterEncodingFilter("utf-8", true, true);

        FilterRegistrationBean filterRegistrationBean = new FilterRegistrationBean();
        filterRegistrationBean.setFilter(characterEncodingFilter);
        filterRegistrationBean.addUrlPatterns("/*");

        return filterRegistrationBean;
    }
}
-在主文件扫描配置类
@SpringBootApplication
@ServletComponentScan(basePackages = "com.learn.springboot.servlet")
public class Application {

	public static void main(String[] args) {
		SpringApplication.run(Application.class, args);
	}

}
疑惑:这样这个filter根本没用,起作用的是setContentType方法而已啊。。。。把这个Filter注释了都行
方式二:
Servlet:
@WebServlet(urlPatterns = "/myservlet1")
public class MyServlet extends HttpServlet {
    @Override
    protected void doGet(HttpServletRequest req, HttpServletResponse resp) throws ServletException, IOException {
        resp.setContentType("text/html");


        PrintWriter writer = resp.getWriter();

        writer.write("你好 hello world!");
        writer.flush();
        writer.close();
    }

    @Override
    protected void doPost(HttpServletRequest req, HttpServletResponse resp) throws ServletException, IOException {
        doGet(req, resp);
    }
}
入口:
@SpringBootApplication
@ServletComponentScan(basePackages = "com.learn.springboot.servlet")
public class Application {

	public static void main(String[] args) {
		SpringApplication.run(Application.class, args);
	}

}
主配置文件application.properties
server.servlet.encoding.enabled=true
server.servlet.encoding.force=true
server.servlet.encoding.charset=utf-8
第九章 SpringBoot打包与部署
9.1 打war包
-程序入口类需扩展继承 SpringBootServletInitializer类并覆
盖 configure 方法
@SpringBootApplication
public class Application extends SpringBootServletInitializer {
public static void main(String[] args) { SpringApplication.run(Application.class, args);
}
@Override
protected SpringApplicationBuilder configure(SpringApplicationBuilder builder) {
//参数为当前 SpringBoot 启动类
return builder.sources(Application.class); }
}
-在 pom.xml 中添加(修改)打包方式为 war
<packaging>war</packaging>
-在 pom.xml 中配置 springboot 打包的插件(默认自动加)
<!--SpringBoot 打包插件--> <plugin>
<groupId>org.springframework.boot</groupId>
<artifactId>spring-boot-maven-plugin</artifactId> </plugin>
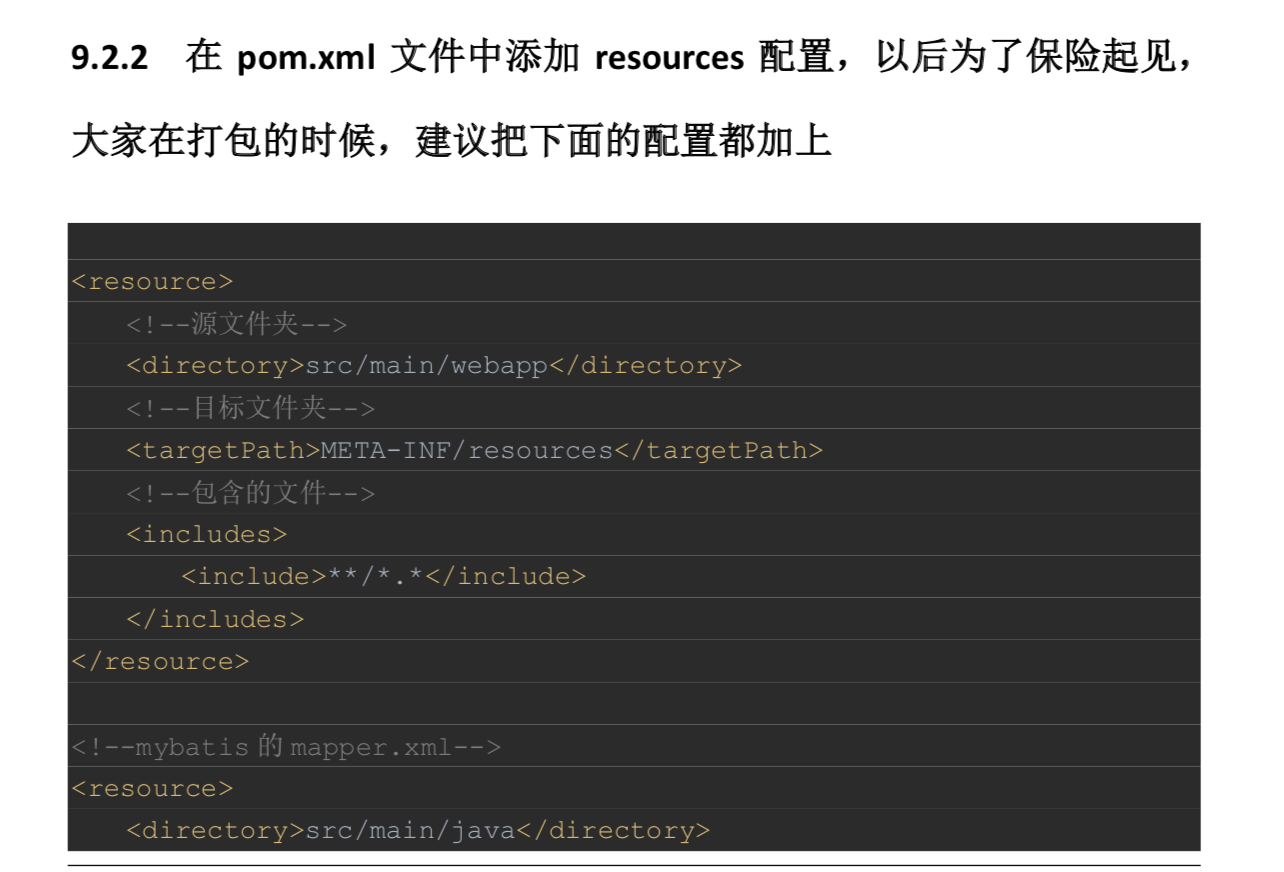
-在 pom.xml 中配置将配置文件编译到类路径
<resource>
<!--源文件夹--> <directory>src/main/webapp</directory> <!--目标文件夹--> <targetPath>META-INF/resources</targetPath> <!--包含的文件-->
<includes>
<include>**/*.*</include> </includes>
</resource>
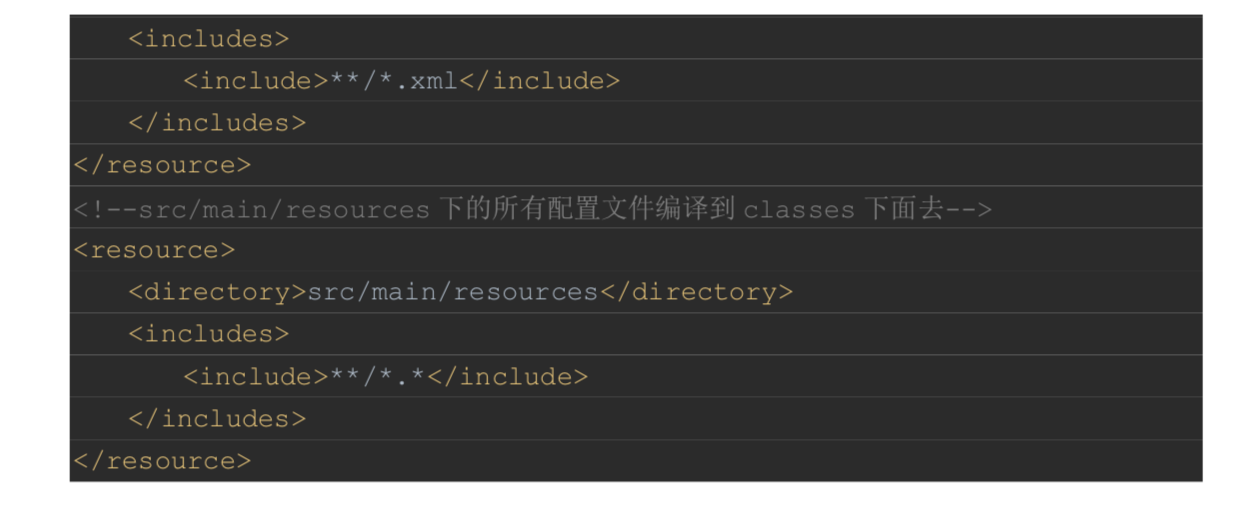
<!--mybatis 的 mapper.xml--> <resource>
<directory>src/main/java</directory> <includes>
<include>**/*.xml</include> </includes>
</resource>
<!--src/main/resources 下的所有配置文件编译到 classes 下面去--> <resource>
<directory>src/main/resources</directory> <includes>
<include>**/*.*</include> </includes>
</resource>
-在 pom.xml 的 build 标签下通过 finalName 指定打 war 包的名字
<!--指定打 war 包的名字-->
<finalName>springboot</finalName>
通过 Maven package 命令打 war 包到 target 目录下
9.2 打jar包

9.3 Spring Boot 部署与运行方式总结

第十章 SpringBoot集成logback日志
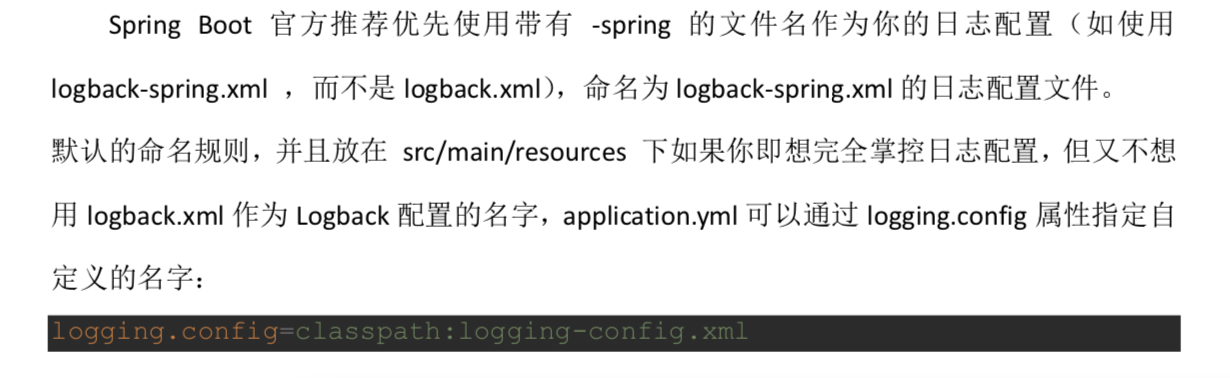
logback-spring.xml
<?xml version="1.0" encoding="UTF-8"?>
<!-- 日志级别从低到高分为 TRACE < DEBUG < INFO < WARN < ERROR < FATAL,
如果 设置为 WARN,则低于 WARN 的信息都不会输出 -->
<!-- scan:当此属性设置为true时,配置文件如果发生改变,将会被重新加载,默认值为 true -->
<!-- scanPeriod:设置监测配置文件是否有修改的时间间隔,如果没有给出时间单位,默认 单位是毫秒。
当 scan 为 true 时,此属性生效。默认的时间间隔为 1 分钟。 -->
<!-- debug:当此属性设置为 true 时,将打印出 logback 内部日志信息,实时查看 logback 运行状态。
默认值为 false。通常不打印
-->
<configuration scan="true" scanPeriod="10 seconds">
<!--输出到控制台-->
<appender name="CONSOLE" class="ch.qos.logback.core.ConsoleAppender">
<!--此日志 appender 是为开发使用,只配置最底级别,控制台输出的日志级别是大 于或等于此级别的日志信息-->
<filter class="ch.qos.logback.classic.filter.ThresholdFilter">
<level>debug</level>
</filter>
<encoder>
<Pattern>%date [%-5p] [%thread] %logger{60} [%file : %line] %msg%n</Pattern>
<!-- 设置字符集 -->
<charset>UTF-8</charset>
</encoder>
</appender>
<appender name="FILE" class="ch.qos.logback.core.rolling.RollingFileAppender">
<!--<File>/home/log/stdout.log</File>-->
<File>/Users/mac/Desktop/springboot-logback.log</File>
<encoder>
<pattern>%date [%-5p] %thread %logger{60} [%file : %line] %msg%n
</pattern>
</encoder>
<rollingPolicy class="ch.qos.logback.core.rolling.TimeBasedRollingPolicy">
<!-- 添加.gz 历史日志会启用压缩 大大缩小日志文件所占空间 -->
<!--
<fileNamePattern>/home/log/stdout.log.%d{yyyy-MM-dd}.log</fileNamePattern>
-->
<fileNamePattern>/Users/mac/Desktop/stdout.log.%d{yyyy-MM-dd}.log</fileNamePattern>
<maxHistory>30</maxHistory><!-- 保留30天日志-->
</rollingPolicy>
</appender>
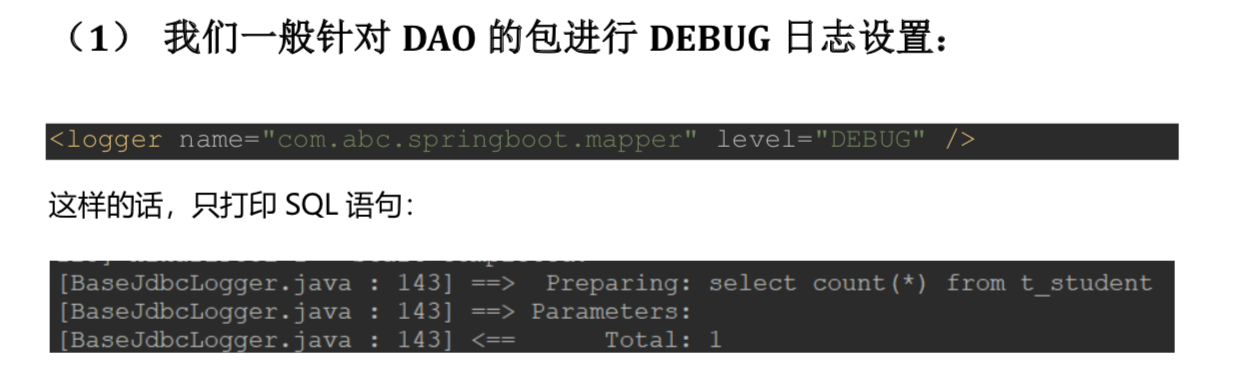
<logger name="com.learn.springboot.mapper" level="DEBUG"/>
<root level="INFO">
<appender-ref ref="CONSOLE"/>
<appender-ref ref="FILE"/>
</root>
</configuration>
第十一章 SpringBoot集成Thymeleaf模板
11.1 认识Thymeleaf
11.2 SpringBoot集成Thymeleaf
在html标签里面添加xmlns:th="http://www.thymeleaf.org"
在h2标签使用th:text="$"获取要显示的数据即可
<!DOCTYPE html>
<html lang="en" xmlns:th="http://www.thymeleaf.org">
<head>
    <meta charset="UTF-8">
    <title>message</title>
</head>
<body>
<h2 th:text="${msg}">展示要显示的信息:</h2>
</body>
</html>
11.3 关闭Thymeleaf页面缓存
1)在主配置文件关闭thymeleaf缓存
#设置thymeleaf模板引擎的前/后缀,可选
spring.thymeleaf.prefix=classpath:/templates/
spring.thymeleaf.suffix=.html

#设置thymeleaf模板引擎的缓存关闭
spring.thymeleaf.cache=false
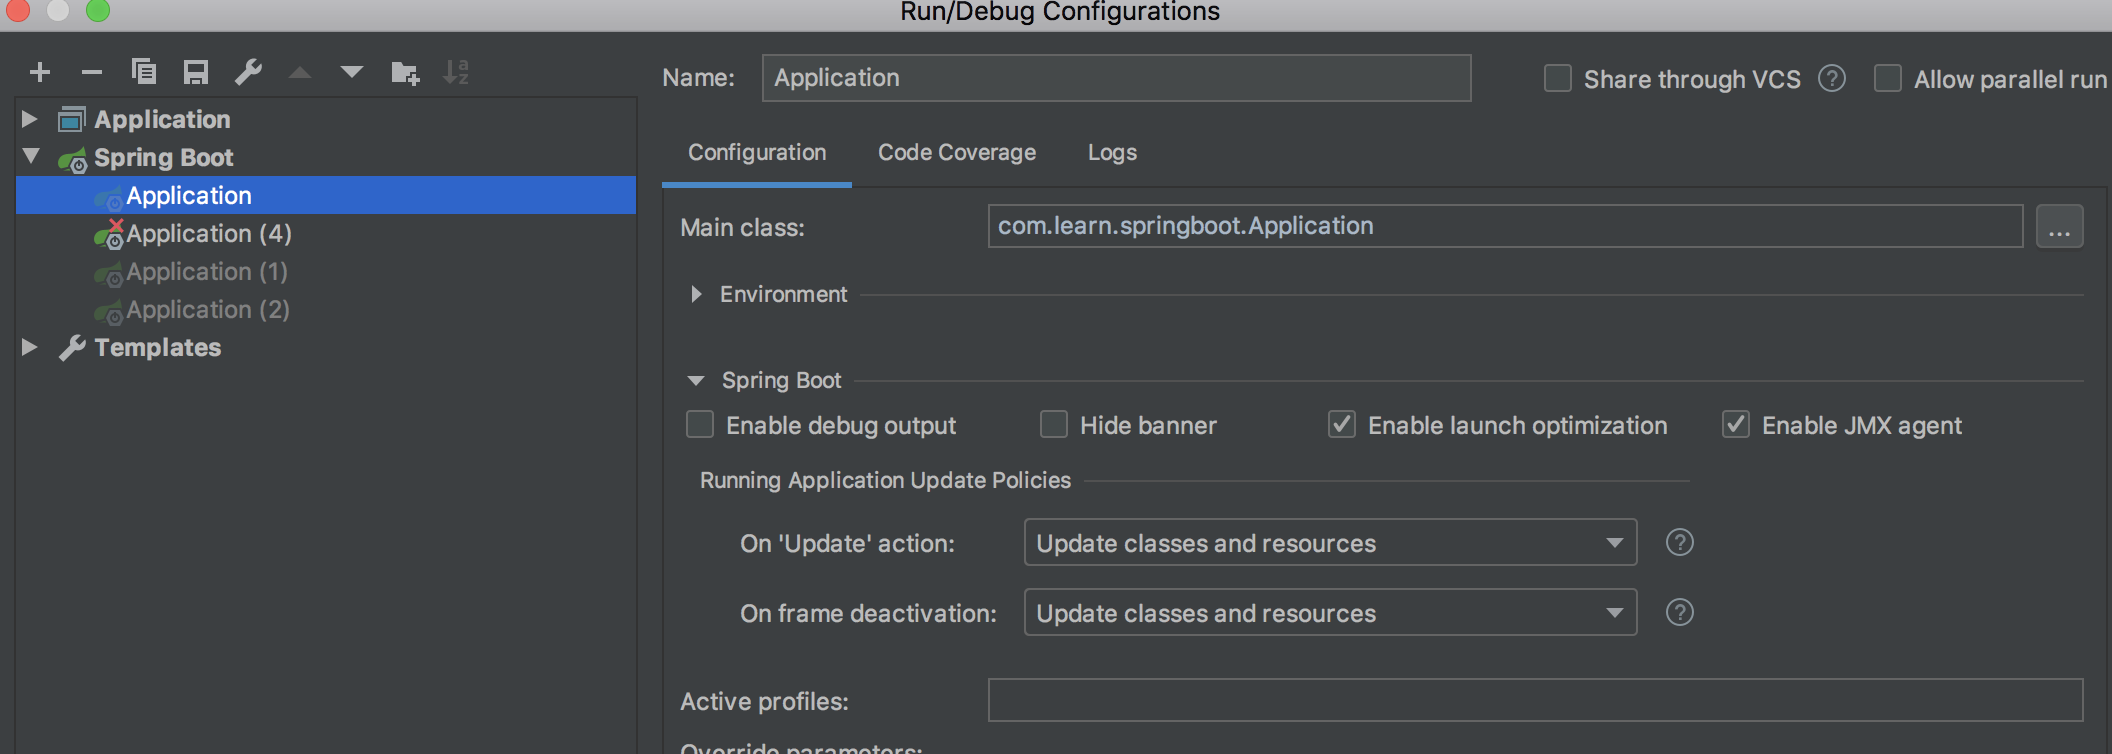
2)配置configuration中为Update classes and resources
11.4 变量表达式
1)标准变量表达式
语法:${...}
说明:标准变量表达式用于访问容器(tomcat)上下文环境中的变量,功能和 EL 中的 ${} 相 同。Thymeleaf 中的变量表达式使用 ${变量名} 的方式获取 Controller 中 model 其中的数据
2)选择变量表达式(不推荐)
语法:*
说明:选择变量表达式,也叫星号变量表达式,使用 th:object 属性来绑定对象
选择表达式首先使用 th:object 来绑定后台传来的 User 对象,然后使用 * 来代表这个对 象,后面 {} 中的值是此对象中的属性。
选择变量表达式 * 是另一种类似于标准变量表达式 $ 表示变量的方法
选择变量表达式在执行时是在选择的对象上求解,而$是在上下文的变量 Model 上求 解,这种写法比标准变量表达式繁琐,只需要大家了解即可
<!DOCTYPE html>
<html lang="en" xmlns:th="http://www.thymeleaf.org">
<head>
    <meta charset="UTF-8">
    <title>Title</title>
</head>
<body>

<h1>标准变量表达式:${}</h1>
用户姓名:<span th:text="${user.name}"></span><br/>
用户id:<span th:text="${user.id}"></span><br/>
用户年龄:<span th:text="${user.age}"></span><br/>

<h1>选择变量表达式()不推荐</h1>
<div th:object="${user}">
    用户编号:<span th:text="*{id}"></span><br/>
    name:<span th:text="*{name}"></span><br/>
    年龄:<span th:text="*{age}"></span><br/>

</div>
<h1>选择变量表达式和标准变量表达式混合使用(不推荐)</h1>
<div>
    用户编号:<span th:text="*{user.id}"></span><br/>
    name:<span th:text="*{user.name}"></span><br/>
    年龄:<span th:text="*{user.age}"></span><br/>
</div>
</body>
</html>
11.5 URL路径表达式
语法:
绝对路径 th:href="@{http://www.xxxx.com}"
相对路径 th:href="@{/xx1/xx2}"
<!DOCTYPE html>
<html lang="en" xmlns:th="http://www.thymeleaf.org">
<head>
    <meta charset="UTF-8">
    <title>URL路径表达式</title>
</head>
<body>
<h1>URL路径表达式:@{...}</h1>
<h2>a标签中的绝对路径(没有参数)</h2>
<a href="http://www.baidu.com">跳转到百度</a><br/>
<a th:href="@{http://www.baidu.com}">th路径表达式:跳转到百度</a><br/>
<a th:href="@{http://localhost:8080/user/detail}">th路径跳转到/user/detail</a><br/>
<a href="http://localhost:8080/user/detail">传统写法跳转到/user/detail</a><br/>

<h2>url路径表达式,相对路径 没有参数(实际开发中推荐使用的)</h2>
<a th:href="@{user/detail}">跳转到/user/detail</a>

<h2>绝对路径(带参数)</h2>
<a href="http://localhost:8080/test?username=lisi">绝对路径,带参数:/test,并带参数username</a><br/>
<a th:href="@{http://localhost:8080/test?username=wangwu}">路径表达式写法,带参数:/test,并带参数username</a><br/>

<h2>相对路径(带参数)</h2>
<a th:href="@{/test?username=lisi}">相对路径,带参数</a>

<h2>相对路径(带参数:后台获取的参数)</h2>
<a th:href="@{'/test?username='+${id}}">相对路径:获取后台参数值</a>

<h2>相对路径,带多个后台获取的参数</h2>
<a th:href="@{'/test1?username='+${username}+'&id='+${id}+'&age='+${age} }">带多个参数</a><br/>
<a th:href="@{/test1(id=${id},username=${username},age=${age})}">带多个参数 简单写法</a><br/>
<a th:href="@{'/test2/'+ ${id} }">请求路径为restful风格 test2</a><br/>
<a th:href="@{'/test3/'+ ${id} + '/' + ${username} }">请求路径为restful风格 test3</a>
<!--<a th:href="@{/test2/(${id}) }">请求路径为restful风格 第二种写法</a>-->
</body>
</html>
<!DOCTYPE html>
<html lang="en" xmlns:th="http://www.thymeleaf.org">
<head>
    <meta charset="UTF-8">
    <title>Title</title>
    <script type="text/javascript" th:src="@{/js/jquery-1.7.2.min.js}"></script>
    <script type="text/javascript">
        $(function () {
            alert("----");
            alert($("#username").val());
        })
    </script>
</head>
<body>
<input type="text" id="username" value="999"/><br/>
<img th:src="@{/img/001.jpg }" width=500><br/>
</body>
</html>
11.6 常用属性
和普通的html一样,只是变成th:propertyname
name->th:name
一般在需要或取后台的数据才用th表达式,普通的写死一个值都是一样的作用。
常见属性
th:each的用法:
1)获取list集合的元素
控制层:
@Controller
public class UserController {

    @RequestMapping("/each/list")
    public String eachList(Model model){
        List<User> userList = new ArrayList<User>();
        for (int i = 0;i < 10;i++){
            User user = new User();
            user.setId(100 + i);
            user.setNick("张" + i);
            user.setPhone("1361234567" + i);
            user.setAddress("北京市大兴区" + i);
            userList.add(user);
        }
        model.addAttribute("userList",userList);
        return "each";
    }
}
页面:
<!DOCTYPE html>
<html lang="en" xmlns:th="http://www.thymeleaf.org">
<head>
    <meta charset="UTF-8">
    <title>Title</title>
</head>
<body>
<!--
    user 当前循环的对象变量名称
    userStat 当前循环对象状态的变量
    ${userList} 当前循环的集合
-->
<div th:each="user,userStat:${userList}">
    <span th:text="'index:'+${userStat.index}"></span>
    <span th:text="'count:'+${userStat.count}"></span>
    <span th:text="${user.id}"></span>
    <span th:text="${user.nick}"></span>
    <span th:text="${user.phone}"></span>
    <span th:text="${user.address}"></span><br/>

</div>

</body>
</html>
2)获取map集合的key和value
控制层:
@RequestMapping(value = "/each/map") public String eachMap(Model model) {
        Map<Integer,Object> userMaps = new HashMap<Integer, Object>();
        for (int i = 0; i < 10; i++) {
            User user = new User();
            user.setId(i);
            user.setName("李四"+i);
            user.setPhone("1390000000"+i);
            user.setAddress("天津市"+i);
            user.setNick("李" +i);
            userMaps.put(i,user);
        }
        model.addAttribute("userMaps",userMaps);
        return "eachMap";
    }
<!DOCTYPE html>
<html lang="en" xmlns:th="http://www.thymeleaf.org">
<head>
    <meta charset="UTF-8">
    <title>Title</title>
</head>
<body>
<h1>循环遍历map集合</h1>
<div th:each="userMap,userMapStat:${userMaps}">
    <span th:text="${userMapStat.count}"></span>
    <span th:text="${userMapStat.index}"></span>
    <span th:text="${userMap.key}"></span>
    <span th:text="${userMap.value}"></span>
    <span th:text="${userMap.value.id}"></span>
    <span th:text="${userMap.value.name}"></span>
    <span th:text="${userMap.value.address}"></span>
    <span th:text="${userMap.value.nick}"></span>

</div>
</body>
</html>
3)获取数组
和list集合相同
4)复杂循环案例
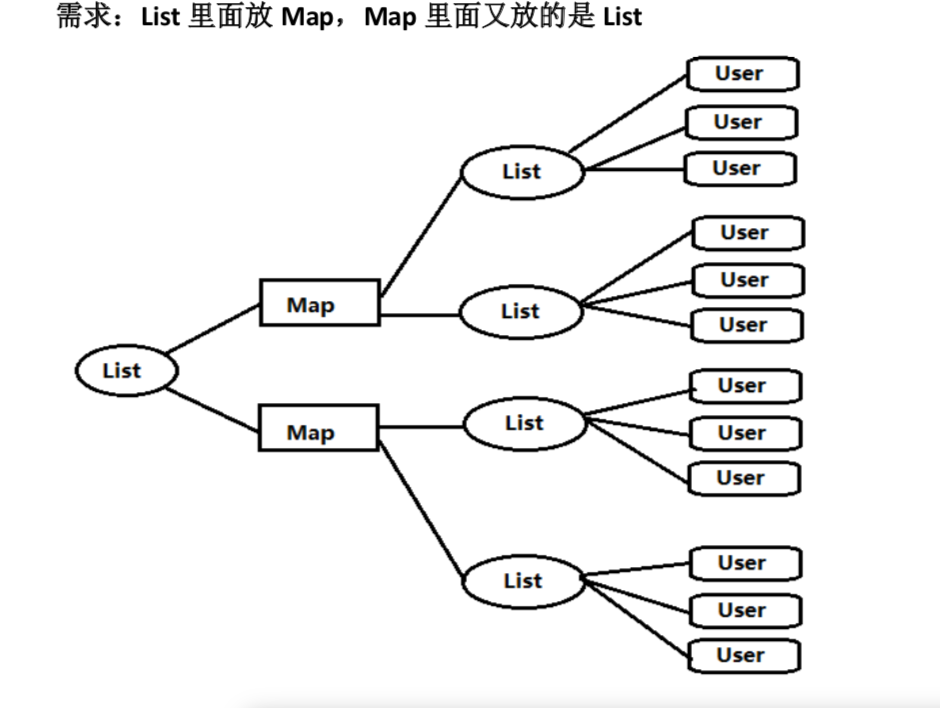
控制层
    @RequestMapping(value = "/each/all") public String eachAll(Model model) {
        //list -> Map -> List -> User
        List<Map<Integer,List<User>>> myList = new ArrayList<Map<Integer, List<User>>>();
        for (int i = 0; i < 2; i++) {
            Map<Integer,List<User>> myMap = new HashMap<Integer,
                    List<User>>();
            for (int j = 0; j < 2; j++) {
                List<User> myUserList = new ArrayList<User>();
                for (int k = 0; k < 3; k++) {
                    User user = new User(); user.setId(k);
                    user.setName("张三"+k);
                    user.setPhone("1350000000"+k);
                    user.setAddress("广州市"+i);
                    myUserList.add(user);
                }
                myMap.put(j,myUserList);
            } myList.add(myMap);
        }
        model.addAttribute("myList",myList);
        return "eachAll";
    }
页面:
<!DOCTYPE html>
<html lang="en" xmlns:th="http://www.thymeleaf.org">
<head>
    <meta charset="UTF-8">
    <title>Title</title>
</head>
<body>
<h3>循环遍历复杂集合:list->map->list->user</h3>
<div th:each="mylistMap:${myList}">
    <div th:each="myListMapObject:${mylistMap}">
        map集合的key:<span th:text="${myListMapObject.key}"></span>
        <div th:each="mapValue:${myListMapObject.value}">
            <span th:text="${mapValue.id}"></span>
            <span th:text="${mapValue.name}"></span>
            <span th:text="${mapValue.address}"></span>
            <span th:text="${mapValue.phone}"></span>
            <span th:text="${mapValue.nick}"></span>
        </div>

    </div>

</div>
</body>
</html>
11.7 条件判断if
<!DOCTYPE html>
<html lang="en" xmlns:th="http://www.thymeleaf.org">
<head>
    <meta charset="UTF-8">
    <title>条件判断</title>
</head>
<body>
<h2>th:if 用法:如果满足条件显示(执行,否则相反)</h2>
<div th:if="${sex eq 1}">
    男
</div>
<div th:if="${sex eq 0}">
    女
</div>

<h2>th:unless 用法:如果满足条件则不执行,否则执行,与if相反</h2>
<div th:unless="${sex eq 0}">
    女
</div>

<h1>th:switch th:case用法</h1>
<div th:switch="${productType}">
    <span th:case="0">产品0</span>
    <span th:case="1">产品1</span>
    <span th:case="*">无此产品</span>

</div>

</body>
</html>
@Controller
public class UserController {

    @RequestMapping("/condition")
    public String condition(Model model){
        model.addAttribute("sex", 1);
        model.addAttribute("flag", true);
        model.addAttribute("productType", 2);
        return "condition";

    }
}
11.8 th:line内敛表达式
th:inline 有三个取值类型 (text, javascript 和 none),值为 none 什么都不做,没有效果
内敛文本(th:inline=”text”)
内敛文本表达式不依赖于 html 标签,直接使用内敛表达式[[表达式]]即可获取动态数据,但 必须要求在父级标签上加 th:inline = “text”属性
内敛脚本(th:inline=”javascript”) th:inline=”javascript”在 js 代码中获取后台的动态数据
<!DOCTYPE html>
<html lang="en" xmlns:th="http://www.thymeleaf.org">
<head>
    <meta charset="UTF-8">
    <title>内敛表达式</title>
</head>
<body>
th:text取<div th:text="${data}"></div>

<h2>内敛文本: th:inline="text"</h2>
<div th:inline="text">
    数据:[[${data}]]
</div>

outside:数据:[[${data}]]


<h2>内敛脚本 th:inline="javascript"</h2>
<script type="text/javascript" th:inline="javascript">
    function showData() {
        alert([[${data}]]);
        alert("111");
    }

</script>

<button th:onclick="showData()">btn</button>
</body>
</html>
11.9 字面量
<!DOCTYPE html>
<html lang="en" xmlns:th="http://www.thymeleaf.org">
<head>
    <meta charset="UTF-8">
    <title>字面量</title>
</head>
<body>
<h1>文本字面量,用单引号'...'的字符串就是字面量</h1>
<a th:href="@{'/user/detail?sex='+${sex}}">查看性别</a><br/>
<span th:text="Hello"></span>

<h1>数字字面量</h1>
今年是<span th:text="2020"></span>年<br/>
</body>

<h1>boolean字面量</h1>
<div th:if="${flag}">
    执行成功
</div>
<div th:unless="${flag}">
    执行失败
</div>

<h1>null字面量</h1>
<span th:text="${user.name}"></span>
<!--<span th:text="${user2.id}">没有值</span>-->
<div th:if="${user2.id eq null}">
    user2.id为空
</div>

</html>
11.10 字符串拼接
<!DOCTYPE html>
<html lang="en" xmlns:th="http://www.thymeleaf.org">
<head>
    <meta charset="UTF-8">
    <title>splice</title>
</head>
<body>

<span th:text="'共'+${totalRows}+'条'+${totalPage}+'页,当前第'+${currentPage}+'页  ,首页 上一页 下一页 尾页'">共120条 12页, 当前第1页 </span>

<h1>使用更优雅的方式拼接字符串: |要拼接的字符串|</h1>
<span th:text="|共${totalRows}条 ${totalPage}页 当前第${currentPage}页 首页 上一页 下一页 尾页|">共120条 12页, 当前第1页 </span>

</body>
</html>
11.11 运算表达式
<!DOCTYPE html>
<html lang="en" xmlns:th="http://www.thymeleaf.org">
<head>
    <meta charset="UTF-8">
    <title>运算符</title>
</head>
<body>

<h2>三目运算符 布尔表达式?正确:错误</h2>
<div th:text="${sex eq 1}? 男 : 女"></div>

<h2>算术运算符</h2>

20+5=<span th:text="20+5"></span><br/>
20-5=<span th:text="20-5"></span><br/>
20*5=<span th:text="20*5"></span><br/>
20/5=<span th:text="20/5"></span><br/>
20%3=<span th:text="20%3"></span><br/>

<h2>关系比较</h2>
<div th:if=" 5 gt 2">
    5>2
</div>

<div th:if=" 2 lt 5">
    2<5
</div>
1<=1:<div th:if="1 le 1">
    真
</div>

<h2>相等判断</h2>
<span th:if="${sex == 1}">男</span>
<span th:if="${sex eq 0}">女</span>
<span th:if="${sex ne 1}">女</span>
</body>

</html>
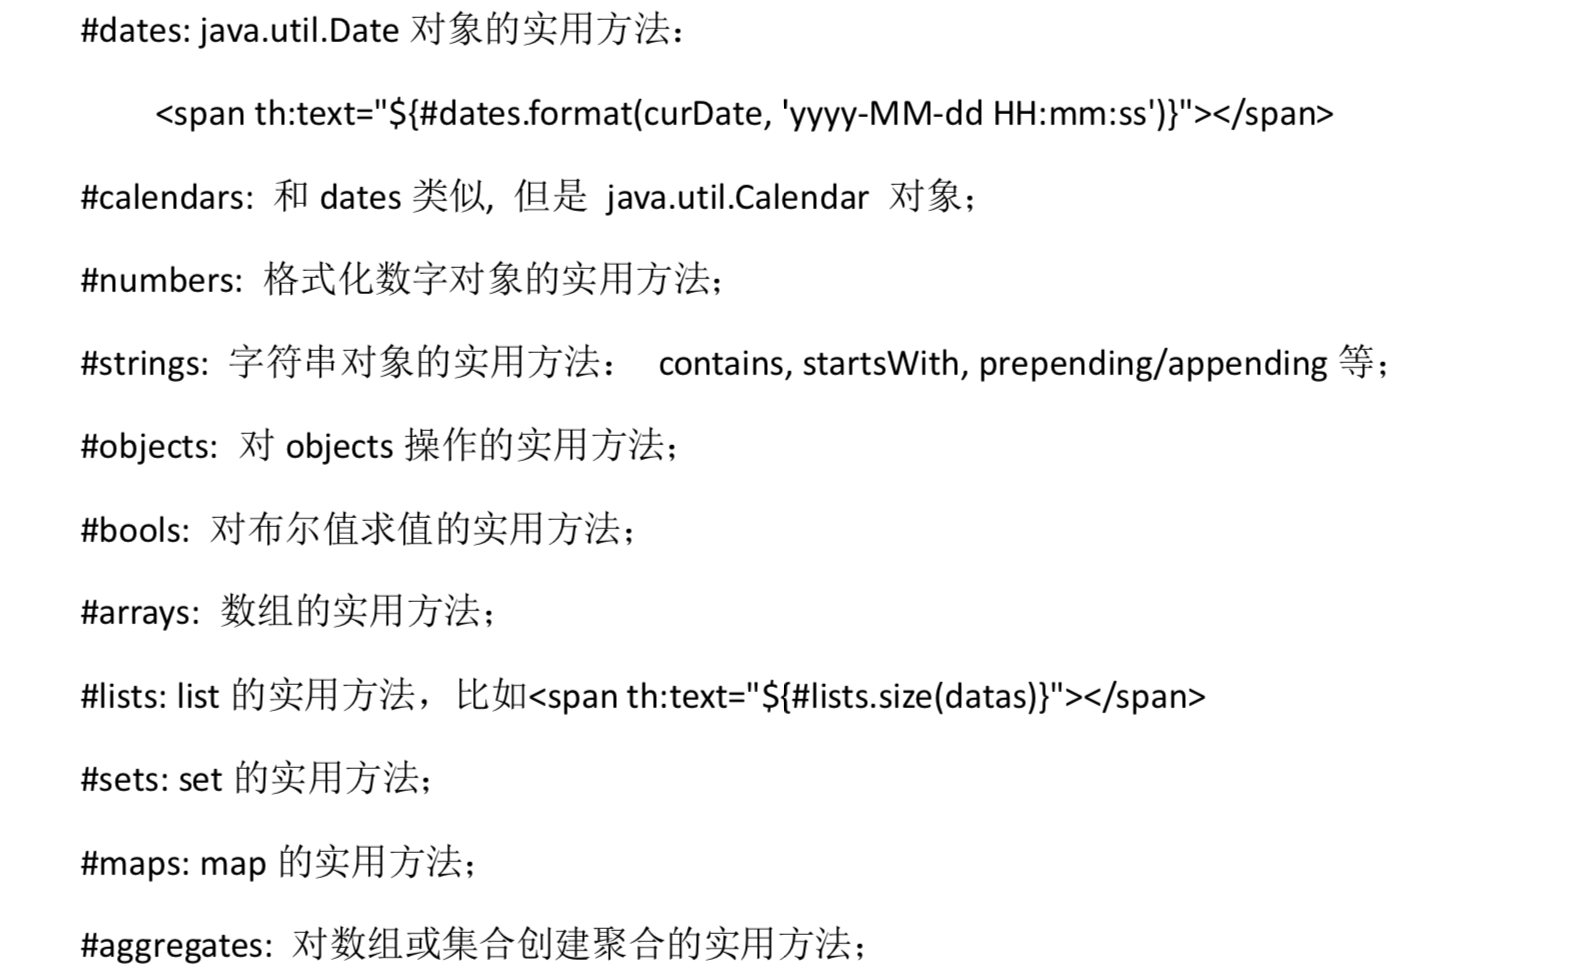
11.12 表达式基本对象
模板引擎提供了一组内置的对象,这些内置的对象可以直接在模板中使用,这些对象由#号开始引用,我们比较常用的内置对象
<!DOCTYPE html>
<html lang="en" xmlns:th="http://www.thymeleaf.org">
<head>
    <meta charset="UTF-8">
    <title>index</title>

</head>
<body>
<h1>从session中获取值:</h1>
<div th:text="${#session.getAttribute('data')}"></div>
<!--<div th:text="${}"></div>-->
<div th:text="${#httpSession.getAttribute('data')}"></div>
<div th:text="${session.data}"></div>
<script type="text/javascript" th:inline="javascript">
    //http://localhost:8080/springboot/user/detail
    //获取协议名称
    var scheme = [[${#request.getScheme()}]];
    // alert(scheme);
    //获取服务器名称
    var serverName = [[${#request.getServerName()}]];
    // alert(serverName);
    //获取端口号
    var port = [[${#request.getServerPort()}]];
    // alert(port);
    //获取上下文根
    var contextPath = [[${#request.getContextPath()}]];

    //工程路径
    alert(scheme+'://'+serverName+':'+port+contextPath);


    var requestURL = [[${#httpServletRequest.requestURL}]];
    alert("requestURL:"+requestURL);
    var queryString = [[${#httpServletRequest.queryString}]];
    alert("queryString"+queryString);
    //完整路径
    alert(requestURL+'?'+queryString);
</script>
</body>


</html>
11.13 表达式功能对象
模板引擎提供的一组功能性内置对象,可以在模板中直接使用这些对象提供的功能方法 工作中常使用的数据类型,如集合,时间,数值,可以使用 Thymeleaf 的提供的功能性对象 来处理它们
官方手册:http://www.thymeleaf.org/doc/tutorials/3.0/usingthymeleaf.html
第十二章 SpringBoot总结及综合案例
参考github上的cases 049 050 051 052